
Installation Guide

Rangaire Manufacturing Company, LP · 501 S. Wilhite Street, Cleburne, TX 76031
(1-800-325-8351) · www.rangairemfg.com
C99043073 G
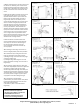
2. Before attaching the mounting brackets to
the top and bottom of the cabinet attach one
mirror clip (Diagram (A1)) to both ends of each
bracket. Position the slot in the clip over the
pre-drilled hole in the flat on the bracket end
and loosely attach with one of the screws
provided in the mirror clip accessory bag. The
bent end of the clip should be pointed down
toward the bracket side (Diagram (A2)).
3. Attach mounting brackets to top and bottom
of cabinet as shown in Diagram (B) using the
nuts and bolts screw cap base and screw covers
(four sets provided) as shown in Diagram (B1).
Adjust the position of the brackets so the
distance between top and bottom edges with
the mirror clips are spaced to the length of the
side mirrors. Do not over tighten the mounting
screws as the body side walls may bend and
prevent proper shelf installation. Only tighten
screws until they are flush with the body.
4. Place the bath cabinet with mounting
brackets attached on the wall. You may have to
adjust the location right or left to center one of
the mounting holes over the stud. Carefully
mark the hole over the wall stud for both top
and bottom brackets. Then, mark one additional
hole on the top and bottom as far away from
the other hole as possible. If the wall stud is
near the center of the cabinet it is
recommended that you use four screws in wall
anchors as far out to the edges of the cabinet as
possible. See Diagram (C).
5. Take cabinet down off of the wall and drill the
wall mounting holes. For the screws into the
wall studs drill a 1/8" pilot hole. The other screw
holes should be made to the recommended size
for the wall anchor you are using. If you use the
drywall anchors provided (four included) with
you bath cabinet a 5/16" hole is required. See
Diagram (D).
6. Insert the included drywall anchors as shown
in Diagram (E). If you use another type anchor it
should be installed per the manufacturer’s
instructions. Proceed in hanging cabinet using
previously drilled holes and the screws
provided. Then, snap screw covers over screw
heads within cabinet. Diagram (G).
1. After you decide where you wish to mount
your bath cabinet, locate at least one wall stud
within the mounting area. The studs are usually
16" on center. As your bath cabinet is about 15"
wide there should be at least one stud within
the area you wish to mount the cabinet. Note:
You may have to move the cabinet slightly left
or right to be able to center one of the
mounting holes over the wall stud.
This surface mounting kit will allow installation of your new Jensen
bath cabinet without cutting a hole in the wall. It is highly
recommended that you locate at least one wall stud within the
mounting area of your bath cabinet.
SIDE MIRROR SURFACE MOUNTING
INSTALLATION INSTRUCTIONS