
Installation guide


2.
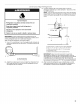
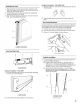
Adjust
the
panel
to
achieve
the
required
spacing,
or
to
align.
IMPORTANT:
If
adjustments
are
needed,
adjust
the
panel
not
the
door.
Adjust
left
to
right
in
the
mounting
bracket
before
using
the
pins
to
adjust
the
panel
up
and
down
or
at
an
angle.
m_
Slide
the
panel
from
side
to
side
in
the
keyhole
slot.
m
Use
a
hex
key
to
raise
or
lower
the
adjustment
pins
which
allows
the
door
panel
to
swivel.
A.
Door
panel
C.
Adjustment
pins
B.
Panel
top
bracket
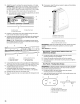
3.
Predrill
4s"
pilot
holes
in
the
door
panel(s)
through
the
open
holes
in
both
the
bottom
and
top
hinges.
Using
the
slotted
hex
head
screws
(provided
with
refrigerator),
attach
the
top
and
bottom
hinges
to
the
door
panels.
Fully
tighten
all
door
panel
screws.
NOTE:
For
36”
models,
there
is
an
additional
bracket
at
the
top
to
fasten
the
panel
to
the
door.
Insert
the
screws
through
the
bracket
into
the
door
panel.
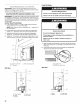
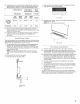
4.
A
\F
V
V
A
D
E
9
26
A.
Top
hinge
B.
Panel
top
bracket
C.
Holes
for
screws
D.
Door
adjustment
pins
E.
Holes
for
screws
(36"
Models
only)
Using
slotted
hex
head
screws
(provided
with
refrigerator)
for
each
side,
attach
the
door panels
to
the
hinge-side
door
trims.
Using
Phillips
head
flat
screws
(provided
with
refrigerator),
install
the
handle
side
door
trim.
Completely
tighten
the
screws
attaching
the
mounting
brackets,
located
at
the
bottom
of
the
doors,
to
the
panels.
Reinstall
the
top
door
trim
and
hinge
cover.
Snap
the
adjustment
pin
cover
(provided
with
refrigerator)
into
place.
10.
If
necessary,
adjust
the
drawer
panel
to
align
and
fully
tighten
all
drawer
panel
screws.
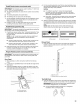
A.
Drawer
overlay
panel
B.
Drawer
panel
bracket
go
Leads,
aig
Only)
IMPORTANT:
Install
the
handles
after
the
door
panels
have
been
installed.
Follow
the
instructions
specific
to
your
door
panel
design.
Tools
Needed:
%2"
Hex
key
Door
Panels
-
Custom
Wood,
Stainless
Steel
and
Oiled
Bronze
Designs
Locate
the
holes
in
the
door
panels
where
the
handle
mounting
studs
are
to
be
installed.
Fasten
the
handle
mounting
studs
to
the
door
panels.
Install
the
handles
to
the
handle
mounting
studs
and
tighten
the
setscrews.
Door
Panels
-
Floating
Glass
Design
IMPORTANT:
To align
the
handle
correctly
on
the
door,
the
plastic
handle
spacer
and
the
setscrews
on
the
door
handle
must
be
in
the
positions
designated
in
the
chart.
1.
Locate
the
holes
in
the
door
panels
where
the
handle
mounting
studs
are
to
be
installed.
Insert
the
circular
post
on
the
back
of
the
handle
spacers
into
the
holes
in
the
door
panels.
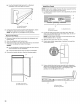
2.
C
s
fF
4
A
v4,
A
\
\
A.
Plastic
handle
spacer
B.
Straight
handle
mounting
posts
C.
Curved
handle
mounting
posts
D.
Circular
post