
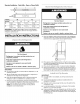
Installation guide


Install
Side
Trims
The
side
trims
cover
the
space
between
the
refrigerator
and
the
adjacent
cabinets.
There
is
a
trim
piece
taped
to
each
side
of
the
refrigerator.
Install
each
trim
piece
to
the
side
of
the
refrigerator
to
which
it
is
taped.
1.
Remove
the
tape
attaching
the
trim
pieces
to
the
sides
of
the
refrigerator.
Set
the
trim
pieces
aside.
IMPORTANT:
For
installations
using
custom
wood
panels
with
%"
gap,
the
bulb-shaped
section
of
the
trim
piece
will
interfere
with
the
panels.
Score
each
trim
piece
at
the
base
of
the
bulb-shaped
section, then
remove
and
discard
this
section.
See
the
Top
View
graphic
later
in
this
section.
2.
Remove
the
four
screws
from
the
side
of
the
refrigerator
cabinet.
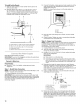
A.
Side
trim
screws
3.
Using
the
original
holes
and
the
screws
removed
in
Step
2,
fasten
the
side
trim
to
the
refrigerator
cabinet.
NOTE:
Make
sure
to
fasten
each
trim
piece
to
the
side
of
the
refrigerator
cabinet
from
which
it
was
removed.
The
bulb-
shaped
section
should
be
forward
with
the
notch
at
the
top,
as
shown.
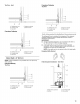
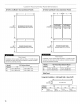
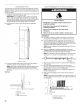
Top
View
enn
fA
anaes
BB
C
©
Deer
A.
Side
trim
B.
Adjacent
cabinet
C.
Door
D.
Bulb-shaped
section
20
DP
ps,
pe
Pb
pmb
wg
em
pgeiiageny
bgm,
Cua,
gow)
1 spn,
gems.
googled,
pm,
Move
Refrigerator
fo
Final
Location
AWARNING
¢
2
Tip
Over
Hazard
Refrigerator
is
top
heavy
and
tips
easily
when
not
completely
installed.
Keep
doors
taped
closed
until
refrigerator
is
completely
installed.
Use
two
or
more
people
to
move
and
install
refrigerator.
Failure
to
do
so
can
result
in
death
or
serious
injury.
IMPORTANT:
mg
To
avoid
floor
damage,
make
sure
levelers
are
raised
(not
touching
floor)
and
refrigerator
is
on
rollers
before
moving.
m_
Use
the
installation
block,
attached
to
the
door
hinge,
as
a
reference
to
make
sure
the
refrigerator
is
pushed
back
far
enough
into
the
opening,
so
that
when
the
panels
are
installed
they
will
be
flush
with
the
adjacent
cabinets.
NOTE:
A
flush
installation
is
not
possible
with
a
24" (60.9
cm)
deep
opening.
mg
After
the
refrigerator
is
leveled
and
aligned,
remove
the
installation
block
from
the
door
hinge and
use
it
to
check
the
spacing
between
the
panels
and
adjacent
cabinets.
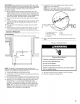
NOTE:
The
installation
block
is
designed
to
provide
accurate
spacing
for
%4"
(1.9
cm),
%"
(9.53
mm)
and
%"
(3.18
mm).
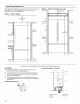
ay"
f
\
Y Y
Yan
(1.9m)
_in
ee
Si
NS
Toe
h
(3.18
mm)
(9.53
mm)
1.
Place
top
of
cardboard
carton
or
plywood
under
refrigerator.
Remove
dolly.
2.
Move
the
refrigerator
straight
back
and
evenly
into
the
opening.
Be
sure
that
the
water
tubing
is
not
kinked
and
the
power
supply
cord
is
on
top
of
the
refrigerator.
NOTE:
If
the
power
supply
cord
is
behind
the
refrigerator,
it
will
not
install
properly.
3.
Make
sure
the
installation
block
is
flush
with
the
adjacent
cabinets.
NOTE:
To
achieve
a
flush
installation,
it
is
critical
to
verify
a
¥4"
(1.9
cm)
depth
from
the
front
face
of
the
adjacent
cabinetry
to
the
refrigerator.
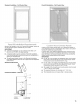
TT
A.
Adjacent
cabinet
or
wall
B.
Installation
block
C.
Face
of
refrigerator