
Foam guidelines
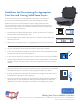

Making Your Gear as Mobile as You Are.
450 Wheeling Rd. l Wheeling, IL 60090 toll free: 888-875-3526 l phone: 847-459-5207 fax: 847-459-5262 l www.jelcoinc.com
JELCO is a registered trademark of JELCO, INC.
Guidelines for Determining the Appropriate
Case Size and Cutting Solid Foam Layers
To ensure that your items are adequately protected, we recommend
that you use the following guidelines when compleng your design.
Solid foam layers are more durable for longer lasng protecon than
pre-cut cube foam, which is intended to be removed and therefore oen
comes apart later on when not intended. Solid foam layers also allow you
to cut to any shape as required.
• For Electronic Equipment/Fragile Items, keep a minimum of 2” (2 layers)
of foam above and beneath your item.
• For Non-Fragile Items, keep a minimum of 1” of foam (1 layer) above and
beneath your item.
• Minimum of 1” between items. 2” suggested for items more than 10 lbs.
• Lay your equipment on the rst layer of foam. Trace with a marker.
• If your case has wheels, posion the heaviest piece of your equipment toward
the wheeled end for best center of gravity.
• If your case is hand carry, posion items in center of case (as much as possible).
• Using a sharp knife with a serrated edge or electric carving knife, cut the foam
along the outline. For best results, use a very sharp knife and cut in a smooth
moon.
• Place the item(s) in the cut-out to conrm t. Then, use rst layer as a template
for addional layers, as required to the appropriate depth (see above).
• If doing mulple cases, complete all the foam cuts using the rst foam set as a
template before gluing the layers together.
• Once t is conrmed, remove your items and glue layers together (if desired)
using hot glue or a spray adhesive. Gluing the layers together increases the
durability of the foam. Allow glue to dry before re-inserng your item(s).
1”
2”
1”