JDS Digital Security Systems P.O. Box 374 New Baltimore, MI 48047 (586) 749-6342 (734) 629-1555 www.jdssecuritysoftware.com Enterprise Table Manager Reference and User Guide 04/25/2007 V1.1 The Table Manager is necessary to manage and create accounts for use by the Web Client and Softsite Enterprise Viewstation software The Table Manager can also be used to manage logins for Softsite32 Enterprise. In this manner, Enterprise only implements the use of the login accounts tab.
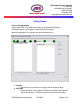
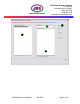
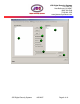
JDS Digital Security Systems P.O. Box 374 New Baltimore, MI 48047 (586) 749-6342 (734) 629-1555 www.jdssecuritysoftware.com Getting Started Launch the Application Double click SS32_TBL_MGR.exe located in the Softsite32 Enterprise installation directory (C:\Program Files\softsite32 Enterprise\). When the application is launched, you see the tables below. 1 2 3 4 5 6 7 1. Groups Allows moving of cameras into groups much like group editor. 2. Facilities Allows Facilities to be created.
JDS Digital Security Systems P.O. Box 374 New Baltimore, MI 48047 (586) 749-6342 (734) 629-1555 www.jdssecuritysoftware.com 3. Bind Groups to Facilities Adds groups to created facilities for organization and access security. 4. Profiles Profiles allow certain login accounts to able to access only there facility or groups of facilities. 5. Login Accounts Setup which login account use which profiles. 6. Rearrange Group Display Order Implementation scheduled for March 2007. 7.
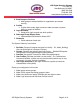
JDS Digital Security Systems P.O. Box 374 New Baltimore, MI 48047 (586) 749-6342 (734) 629-1555 www.jdssecuritysoftware.com Step 1) Make Logical Camera Groups In most cases the groups will already have been created in Softsite32 Enterprise (refer to softsite32 enterprise manual or group manager documentation). You can create them here as well To make camera groups click on the Group tab after launching the application (SS32_TBL_MGR.exe). 1.
JDS Digital Security Systems P.O. Box 374 New Baltimore, MI 48047 (586) 749-6342 (734) 629-1555 www.jdssecuritysoftware.
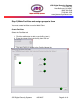
JDS Digital Security Systems P.O. Box 374 New Baltimore, MI 48047 (586) 749-6342 (734) 629-1555 www.jdssecuritysoftware.com Step 2) Make Facilities and assign groups to them You must create facilities to use the Web Client. Create Facilities Select the Facilities tab 1. Click the add button to add a new facility (see 1). 2. Enter the name of the new facility then click ok. 3. The new Facility is added to the Facility Names list.
JDS Digital Security Systems P.O. Box 374 New Baltimore, MI 48047 (586) 749-6342 (734) 629-1555 www.jdssecuritysoftware.com Add Groups to Facilities Select the Bind Groups to Facilities Tab 1. Select the Facility name that you wish to add camera groups to (see 1). 2. Click on the Group you wish to place in the Facility (see 2). 3. Left click and drag the group to the groups under current facility list (see 3). 4. Release and click ok. 5.
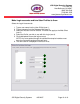
JDS Digital Security Systems P.O. Box 374 New Baltimore, MI 48047 (586) 749-6342 (734) 629-1555 www.jdssecuritysoftware.com Step 3) Make User profiles, assign Facilities and User Rights to them Create user profiles Select the Profiles tab 1. Click add to create the name of the new profile (see 1). 2. Type the name of the new profile and click ok. 3. The New profile is displayed in the User Profile Names list (see 2). Assign facilities and user rights to profiles 1.
JDS Digital Security Systems P.O. Box 374 New Baltimore, MI 48047 (586) 749-6342 (734) 629-1555 www.jdssecuritysoftware.
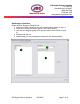
JDS Digital Security Systems P.O. Box 374 New Baltimore, MI 48047 (586) 749-6342 (734) 629-1555 www.jdssecuritysoftware.com Make Login accounts and bind User Profiles to them Select the Login Accounts tab 1. Type a user name into the User ID field (see 1). 2. Type a password into the Password field (see 2). 3. Select the Access Level for Softsite: This does not apply to the Web Client (see 3). 4. Select the Profile you wish to use with this Login (see 4). 5. Click add/update to save the login account.
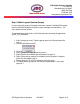
JDS Digital Security Systems P.O. Box 374 New Baltimore, MI 48047 (586) 749-6342 (734) 629-1555 www.jdssecuritysoftware.com TABS Group Tab 4 2 5 6 1 3 7 8 1. Server/Camera List All cameras in the database are listed here. Left Click to select a camera and then right-drag camera to the grouped server list after selecting a group. 2. Group List Drop down menu to select group to add cameras to. Must be selected prior to dragging cameras over. 3.
JDS Digital Security Systems P.O. Box 374 New Baltimore, MI 48047 (586) 749-6342 (734) 629-1555 www.jdssecuritysoftware.com Delete a group from the group list. 6. Don’t Prompt Button Don’t prompt before changes made. 7. Remove Button Remove a camera from the current group selected. 8. Close Button Close the Table Manager.
JDS Digital Security Systems P.O. Box 374 New Baltimore, MI 48047 (586) 749-6342 (734) 629-1555 www.jdssecuritysoftware.com Facilities Tab 2 1 3 4 5 1. Facility List List of all Facilities added to the table. 2. Add Button Add a Facility. 3. Rename Button Rename a selected Facility. 4. Delete Button Delete a selected Facility. 5. Close Button Close the Table Manager.
JDS Digital Security Systems P.O. Box 374 New Baltimore, MI 48047 (586) 749-6342 (734) 629-1555 www.jdssecuritysoftware.com Bind Groups to Facilities 2 1 3 4 5 1. Master Group List List of all groups in the database. Left click to select group and right drag to groups under facility list after facility has been selected. 2. Facility List Select facility you would like to add groups to. Must select before dragging a group over. 3.
JDS Digital Security Systems P.O. Box 374 New Baltimore, MI 48047 (586) 749-6342 (734) 629-1555 www.jdssecuritysoftware.com Profiles Tab 2 8 3 4 5 1 6 6 7 9 10 1. User Profile Names List of all profiles created. 2. Add Button Add a Profile to the list. 3. Rename Button Rename the selected profile. 4. Delete Button Delete the selected profile. 5. All Access Check Select to allow selected profile to access all functions. 6.
JDS Digital Security Systems P.O. Box 374 New Baltimore, MI 48047 (586) 749-6342 (734) 629-1555 www.jdssecuritysoftware.com b. Allow PTZ: Allows PTZ movement c. Allow Playback: Allows access to archives d. Allow Map Access: Allows map access when a map is configured e. Allows Clipboard/Export: Allows clipboard and export use when reviewing archives. Note: Setting is ignored when playback is disabled f. Allow Archive Copy: Allows archive to be saved to local machine or to fixed path g.
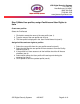
JDS Digital Security Systems P.O. Box 374 New Baltimore, MI 48047 (586) 749-6342 (734) 629-1555 www.jdssecuritysoftware.com Login Accounts Tab 2 3 1 4 5 6 9 7 8 1. User ID List User ID’s listed in the database and any added here, are displayed here. 2. User ID User ID is entered here. 3. Password Password is entered here. 4. Access Level Access Level is selected here (Softsite32 functionality). 5. User Profile User Profile attached to User ID is selected here (Web Client functionality). 6.
JDS Digital Security Systems P.O. Box 374 New Baltimore, MI 48047 (586) 749-6342 (734) 629-1555 www.jdssecuritysoftware.com Adds New or updates current User ID. 7. Delete Button Deletes the selected User ID. 8. Close Button Close the Table Manager. 9. Clipboard Places login information on the clipboard for pasting into another application. Rearrange Group Display Order This Tab is not implemented currently.
JDS Digital Security Systems P.O. Box 374 New Baltimore, MI 48047 (586) 749-6342 (734) 629-1555 www.jdssecuritysoftware.com Reference Tab 1 1. Close Close the Table Manager.