OWNER’S GUIDE PRODUCT LINE: MODEL NUMBER: PRO SOUND COMES HOME™ JBL Soundgear™ Series SG 2020 , SG 3030 D E S I G N G O A L : Bring the live sound of the concert hall into the home S Y S T E M T Y P E : Complete bookshelf sound system JBL Consumer Products 250 Crossways Park Drive, Woodbury, NY 11797 8500 Balboa Boulevard, Northridge, CA 91329 800-336-4JBL (4525) (USA only) www.jbl.com S P E A K E R D E S I G N : 2-Way (SG2020) or 3-Way (SG3030) Bass Reflex ©2000 JBL, Incorporated.
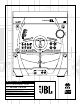
X + 0 + Y2 0 M HZ X + 0 + Y 2 0 M HZ” X + 0 + Y2 0 OWNER’S GUIDE PRODUCT LINE: MODEL NUMBER: JBL Soundgear™ Series SG 2020 , SG 3030 D E S I G N G O A L : Bring the live sound of the concert hall into the home S Y S T E M T Y P E : Complete bookshelf sound system S P E A K E R D E S I G N : 2-Way (SG2020) or 3-Way (SG3030) Bass Reflex S O U R C E U N I T : AM/FM Radio with 3-CD Changer and Dual Full Logic Decks P R O F E S S I O N A L R E F E R E N C E : Live concert sound reinforcement systems
SAFETY INFORMATION 4 GETTING STARTED 4 Controls and Connections 4 Front Panel 5 Rear Panel 6 Display 7 Remote Control 8 Remote Control Operation 8 Batteries 8 Using the Remote Control 9 Connections 9 External Sources 9 Digital Outputs 9 Loudspeakers 10 Headphones 10 Antenna 10 Setting the Clock 11 Basic Operation 11 Auto Function Select System 11 Volume Adjustment 11 Tone Adjustments 11 Boost 11 EQ (Equalization) 11 Mute 11 Display Mode 11 Demo Mode 11 FM Stereo/ANR (AM Noise Reduction) 11 VMAx 12 ENJOYIN
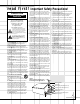
re a d f i rs t ! CAUTION RISK OF ELECTRIC SHOCK DO NOT OPEN CAUTION: To prevent electric shock, do not use this (polarized) plug with an extension cord, receptacle or other outlet unless the blades can be fully inserted to prevent blade exposure.
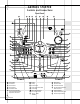
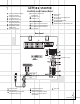
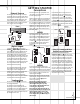
GETTING STARTED Controls and Connections Front Panel ¡ ™ £ ¢ ∞ § ¶ • ª 43 ‚ 42 41 ⁄ 40 39 38 37 36 34 ‹ ¤ › 35 fi 33 fl ‡ 32 ° · 31 k a j b i h c d g f ¡ ™ £ ¢ ∞ § 4 Power button Clock button Alarm 1 button Alarm 2 button Set/Station button Tune Down/Up (AM/FM), Fast Forward/Rewind (Tape), Skip/Search (CD) button e ¶ • ª ‚ ⁄ ¤ ‹ › Display CD Tray Remote Sensor CD Tray Open/Close button Volume knob Tape A/B Select button Aux 1/2 Select button button fi fl ‡ ° Boost button E
GETTING STARTED Controls and Connections c Preset Up (AM/FM)/Forward Play (Tape)/Play (CD) button d Record/Pause (Tape) button e Aux 1/MP3 Input jacks f Optical Digital Output jack g Preset Down (AM/FM)/ Reverse Play (Tape) button h Play Mode/Demo button i Hi-Speed (Tape to Tape) Dubbing button j Tape Deck A (Play) Door k Normal Speed (Tape to Tape) Dubbing button 31 Tape Deck A Eject 32 Headphones jack 37 38 39 40 41 CD Control Buttons: 42 33 43 34 35 36 Disc 1 button: Disc Direct Play button Disc
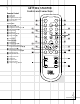
GETTING STARTED Controls and Connections Display a b c e fg h i d j klm n o 1 2 31 30 a Volume Level b Disc Number indicators c Information Display for Level, Function, Clock, Frequency, Tape Counter, CD Time, Programmed Play List d CD Track Numbers Remaining e CD Play Over indicator f CD Sync Recording indicator g CD Play/Pause indicator h Tape Direction indicators i Record indicator 6 y ` 29 28 j Rewind indicator k Play Mode indicators (Used only for Deck B) l Hi-Speed Dubbing indicator m Fas
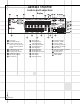
GETTING STARTED Controls and Connections Remote Control 1 2 3 4 5 Power button Mute button Tuner/Band (AM/FM) button Tuner Preset ¤/ ⁄ buttons Aux 1/2 button Power mute 1 2 tuner Tape Functions 6 Stop button ■ 7 Forward Play button › 8 Record/Record Pause button Î ■ ■ 9 Fast Forward button ›› ) Tape A button ! Tape B button @ Reverse Play button ‹ # Rewind button ‹‹ preset 3 4 tape a tape b 5 ) ! 6 @ 7 8 # $ Sleep button repeat CD/Tuner Functions % Repeat button ^ Play/Pause button ›■ ■ & Re
GETTING STARTED Remote Control Operation Batteries Using the Remote Control Before using the remote control for the first time, insert two AAA (UM-4, IEC R03)-type highquality batteries, as shown in the diagrams below. Be sure to observe correct battery polarity (+ and –), as installing the batteries incorrectly may damage the remote. Do not use different types of batteries together, and do not mix old ones with new ones. Open the battery cover Approx. 23 ft.
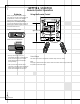
GETTING STARTED Connections External Sources Two RCA-type jacks marked AUX 1 and AUX 2 are provided. The front input jacks (AUX 1/MP3) should be used for temporary connections, such as an MP3 player, MiniDisc (MD) player, video camera or video game. The rear input jacks (AUX 2) should be used for longer-term connections, such as a VCR or CD Recorder.
GETTING STARTED Connections (cont.) Headphones Connecting a headphone 32 automatically disables the loudspeakers in order to provide a private listening session. Antenna Important FM Antenna Connection Unless radio signals are very weak, no external antenna is necessary. Simply connect the supplied FM indoor antenna wire to the terminal marked FM on the back of the unit 44 . AM Antenna Connection Connect the supplied AM loop antenna to the terminal marked AM on the back of the unit 44 .
GETTING STARTED Basic Operation Auto Function Select System JBL Soundgear allows you to automatically switch sources by selecting a function associated with the new source in a single step, without having to press an input or source select button.
ENJOYING JBL SOUNDGEAR Listening to the Radio Automatic Tuning 1. Turn on the Power ¡ 1. 2. Press the Tuner/Band button 41 3 repeatedly to choose either AM or FM radio. 3. Press and hold the Tuning Down/Up (Tune ¤/Tune ⁄ ) button §&( for more than 0.5 seconds. The unit will scan and automatically tune in a station of acceptable broadcast strength. Manual Tuning 1. Turn on the Power ¡ 1. 2. Press the Tuner/Band button 41 3 repeatedly to choose either AM or FM radio. 3.
ENJOYING JBL SOUNDGEAR Playing CDs Your JBL Soundgear system will play discs displaying the Compact Disc Digital Audio logo . It will also play properly finalized CD-R discs. JBL Soundgear is not able to play CD-RW, DVD, Video CD, computer data discs, or any other type of disc except CD or CD-R, as noted above. Stopping Play Press the Stop/Reset button 43 *. Pause Press the CD Pause ›■ ■ button 40 ^. To resume play, press the CD Pause ›■ ■ button 40 ^ again, or press the Play button c^.
ENJOYING JBL SOUNDGEAR Playing CDs Basic Operation (cont.) Programmed Play Repeating Tracks You may program a play list of up to 20 tracks anywhere on up to 3 discs. 1. While in Stop mode, press the CD/Tuner Program button bÓ. 2. Press one of the Disc Selector buttons 33 34 35 or the Disc Skip button 36 Ô to select a disc. If the correct disc is already in position, then press the CD Skip/Search ■‹‹ ‹‹ §& or ›› ››■ §( buttons once to select the disc so that it appears in the display c. 3.
ENJOYING JBL SOUNDGEAR Using External (Auxiliary) Sources Playback 1. Switch on the auxiliary device (TV, VCR or MP3 player) connected to the front or rear AUX 1 or AUX 2 jacks. 2. Select the desired auxiliary device by repeatedly pressing the Aux 1/2 button ‹5. 3. See the Recording section on page 16 for information on tape recording from an auxiliary source. JBL Soundgear can only use normal bias tapes. It is equipped with two cassette decks, “A” and “B”.
ENJOYING JBL SOUNDGEAR Recording Tapes Recording From a CD, Radio or Externally Connected Equipment Recordings can only be made using Deck B. Only normal bias tapes should be used. 1. Power the unit on ¡1, and insert a blank tape into Deck B. Use the Fast Forward §9 or Rewind §# buttons to proceed to the point where you wish the recording to start. Make sure to proceed past the tape leader to avoid missing the beginning of the source signal. 2.
ADVANCED FEATURES Dual Alarms and Timer Recording Alarm and Timer Setting JBL Soundgear offers a flexible dual alarm and timer capability, which allows you to program the system to either play or record two different sources at two different times, for as long a duration as you choose. 1. Make sure the current time displayed c is correct by pressing the Clock button ™; see the Setting the Clock section of this manual on p. 10 to set the clock correctly.
TROUBLESHOOTING If there is no sound from either of the speakers: • Check that the unit is plugged into an active electrical outlet. • Check that the unit is turned on, and that a source is selected and playing. If Tape or CD was selected, make sure that a cassette or disc has been inserted. • Check that the Mute function has not been selected and, if it has, turn it off using the remote control. • Adjust the Volume Control ⁄.
Specifications System Output Power Sound Pressure Level Frequency Response Signal-to-Noise Ratio (Aux Input) Dimensions (W x H x D) Main Unit Speakers (each) Net Weight Main Unit Speakers (each) Shipping Weight (system, accessories, packing) Speaker System Type Woofer Midrange Tweeter CD Frequency Response Signal-to-Noise Ratio Tuner FM Tuning Range Intermediate Frequency Signal-to-Noise Ratio (Mono/Stereo, 98MHz) Frequency Response AM Tuning Range Intermediate Frequency Frequency Response Cassette Deck FF