
User Manual

Leviton Manufacturing Co., Inc. Global Headquarters
201 N. Service Rd. Melville, NY 11747-3138 Tech Line: 1-800-824-3005 Fax: 1-800-832-9538
Leviton Manufacturing Co., Inc. Energy Management, Controls and Automation.
4330 Michoud Blvd., New Orleans, LA, 70129 Tel: 1-504-736-9810 Fax: 1-504-253-2954
Visit our Website at: www.leviton.com/emca
©2016 Leviton Manufacturing Co., Inc. All rights reserved. Subject to change without notice.
SAT-10101
REV SEP 2016
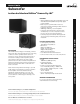
Leviton Architectural Edition Powered by JBL
®
Subwoofer
PRODUCT DATA
ORDERING INFORMATION
DESCRIPTION CAT. NO.
Leviton Architectural Edition Powered by JBL 100W RMS, 200W Dynamic, Powered Subwoofer in Bass-Reflex Enclosure LAESW-000
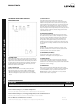
SUBWOOFER REAR-PANEL CONTROLS
AND CONNECTION
1) POWER MODE:
When switched to ‘Auto’ position, the subwoofer will then be
in Standby mode. It will automatically turn on when an audio
signal is detected and will return to the Standby mode when
no audio signal is detected after approximately 10 minutes.
Setting this switch to ‘On’ keeps the subwoofer powered
until Power Switch is turned ‘O.’
2) ON/STANDBY LED:
When the Power Switch is in the ‘On’ position, this LED
indicates the subwoofer is either in On or Standby state.
• When the LED glows blue, the subwoofer is turned On.
• When the LED glows red, the subwoofer is in the Standby
mode.
3) PHASE SWITCH:
This switch determines whether the subwoofer
transducer’s piston-like action moves in and out in phase
with the main speakers. If the subwoofer were to play out
of phase with the main speakers, the sound waves from the
main speakers could partially cancel out the sound waves
from the subwoofer, reducing bass performance and sonic
impact. This phenomenon depends in part on the placement
of all the speakers relative to the listening position and to
each other in the room
4) CROSSOVER CONTROL:
This control determines the highest frequency at which
the subwoofer reproduces sounds. The higher you set the
Crossover control, the higher in frequency the subwoofer
will operate and the more its bass will “overlap” that of
the speakers. This adjustment helps achieve a smooth
transition of bass frequencies between the subwoofer and
the speakers for a variety of dierent rooms and subwoofer
locations.
5) VOLUME:
Use this control to adjust the subwoofer’s volume. Turn
the knob clockwise to increase the volume; turn the knob
counterclock-wise to decrease the volume.
6) SUBWOOFER (LFE INPUT):
Connect the subwoofer to the dedicated
subwoofer / LFE output of a receiver/processor.
7) POWER SWITCH:
Set this switch in the ‘On’ position to turn the subwoofer
on. If you will be away from home, or will not be using the
subwoofer for an extended period, set this switch in the ‘O’
position to conserve energy.
8) POWER INPUT:
After you have made and verified the subwoofer’s input
connection, plug the power cord into an active, unswitched
electrical outlet for proper operation of the subwoofer.
DO NOT plug the power cord into the accessory outlets
found on some audio components.