
Owner's Manual

THANK YOU FOR YOUR PURCHASE
...
Your
JBL
product has been designed
to
provide you with
D the performance and ease
of
operation you would expect
from JBL.
• Please take time
to
read your owner's manual
in
its
entirety before operating or installing your subwoofer.
• Keep the owner,s manual for
JBL
BassPro Hub
in
your
glove compartment along with the owner,s manual for
your
car.
• Put your subwoofer sales receipt with other important
documents
in
order
to
expedite warranty service if
needed.
ABOUT THE MANUAL
This manual describes general installation guidelines
and operation instructions. However, please note that
proper installation
of
mobile audio and video components
requires qualified experience with mechanical and electrical
procedures.
If
you
do
not have the knowledge and tools
to
successfully perform this installation, we strongly recommend
consulting
an
authorized
JBL
dealer about your installation
options. Keep
all
instructions and sales receipts for
reference. Consider this manual as
an
indispensable feature
of
your subwoofer.
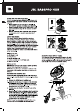
What's
in
the box:
1 x
JBL
BassPro Hub
1 x wiring harness
1 x vehicle mounting post
1 x remote controller with 16-2/5"(5m) cable
1 x Owner's manual
INSTALLATION
IMPORTANT:
Disconnect the vehicle's negative (-) battery
terminal before beginning the installation.
NOTE:
You
may find it more convenient to make
all
of
the
connections
to
the amplifier base before you permanently
mount
it.
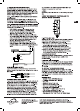
MOUNTING THE BASSPRO HUB
The BassPro Hub mounts inside the rim
of
the spare tire
in
your trunk.
To
mount the BassPro Hub properly, follow these
steps:
1 . Remove the vehicle's spare mounting post.
2.
Make sure that the spare tire
is
placed
in
the trunk with
the outside
of
the tire facing downwards; the back
of
the
rim
should be facing you. This will ensure sufficient
mounting depth for the BassPro Hub.
3.
Carefully place the BassPro Hub inside the rim
of
the
spare tire.
4. Insert the BassPro Hub mounting post into the slot
in
the
center
of
the BassPro Hub. When it reaches the spare
tire mounting bracket, begin turning clockwise
to
thread
the post into the bracket and tighten. Some applications
require the use of the included adapter
to
provide a
threaded slot for the mounting post.
NOTE:
To
keep from damaging the BassPro Hub or the
spare tire rim,
do
not overtighten the mounting post.
T
l~
original
base
T
'il
Take
outthe
BASSPRO HUB INPUT PANEL
You'll make
all
wiring connections at the panel on the right
side
of
the BassPro Hub.
To
access the panel, remove
two
screws securing the cover on the
top
panel
of
the BassPro
Hub, then lift off the cover
(see
illustration below).