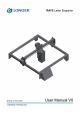
Dear customer, Thank you for choosing LONGER products RAY5. Maybe you are familiar with the engraving machine or have bought a similar engraving machine before, we still highly recommend that you read this manual carefully. The installation techniques and precautions in this manual can help you avoid any unnecessary damage or frustration. More information please refer to: 1. Please contact us via email: support@longer3d.com. 2. Facebook page and YouTube channel as shown below.
Contents A. Safety Precautions............................................................................................ 1 B. Product Information......................................................................................... 8 (1) Specifications ......................................................................................... 8 (2) Components Introduction ..................................................................... 9 (3) Packing List ........................................
A. Safety Precautions (1) The RAY5 engraves and cuts materials by the means of a high-energy diode laser beam. The hazards associated with a high-energy diode laser beam include the possibility of fires, generation of hazardous and/or irritating toxic fumes, but more importantly damage to eyes and skin. (2) Laser engravers are divided into several internationally valid classes based on their performance and the risk of injury.
The high energy laser beam can cause severe eye damage, including blindness and serious skin burns. Improper use of the controls and modification of the safety features may cause serious eye injury and burns. Please wear Personal Protective Equipment (PPE, Safety Glasses are designed to filter specific ranges of laser wavelength. The RAY5 Safety Glasses provided are specific for LONGER Laser Module;) when using the machine. • DO NOT look directly into the laser beam.
you can pay attention to the LONGER products (cover) in the follow-up. (4) The high-energy diode laser beam can produce extremely high temperatures and significant amounts of heat as the substrate material is burned away while engraving and cutting. Some materials are prone to catch fire during cutting operations creating flame, fumes, and smoke. (5) Although the RAY5 has a built-in flame sensor, this technology should NOT be considered 100% accurate and should be seen only as a warning system.
• DO NOT use materials that are highly flammable, explosive or produce toxic by-products. • DO NOT remove material from the cutting bed before it has cooled. • DO NOT leave the RAY5 operating unattended. • ALWAYS clean up clutter, debris, and flammable materials in the laser RAY5 bed after use. • ALWAYS keep a properly maintained fire extinguisher nearby. • DO NOT allow the USB cable to contact with the laser Beam. • DO NOT allow the 24V power cable to contact with the laser Beam.
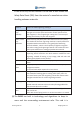
is not in this list, do not consider it to be safe to use. Obtain the Safety Data Sheet (SDS) from the material’s manufacturer when handling unknown materials. Material Reason to avoid engraving / cutting it PVC (Poly Vinyl Chloride) PVC will emit Chlorine gas when laser cut, or laser engraved.
important to understand the RAY5 is not a toy and should be operated with care and respect. (10) Important information regarding your RAY5 RAY5 20W use 24V DC power system: • Never Use a different voltage Power Adapter. The RAY5 requires DC 24V 5A. • When using an alternative Power Adapter, the Voltage should always be 24V, the minimum Amperage output should be 5A. Higher amperage output Power Adapter can be used without risk of damage to your RAY5.
Motherboard and the Power adapter to mains power a green LED does not turn on, please verify your power adapter is receiving Mains Power. www.longer3d.com 7 info@longer3d.
B. Product Information (1) Specifications Machine Machine Model RAY5 20W Working Area 375 x 375 mm (14.76 x 14.76 in) Power Adapter Input Voltage (AC) 110-240 V, 50-60 Hz Power Adapter Output Voltage (DC) 24 V Power Max Consumption 120 W Packaging Size 621 x 347 x 127mm(24.45 x 13.66 x 5 in) Packaging Weight 5.51 Kg Machine Size Assembled 61 x 67 x 20 cm (24.0 x 26.4 x 7.
(2) Components Introduction www.longer3d.com 9 info@longer3d.
(3) Packing List www.longer3d.com 10 info@longer3d.
(4) Machine assembly The machine step-by-step assembly process is described in the document “RAY5 20W Quick Start Guide”. Please follow the guide to assemble machine. • During the machine assembly, if there is any unclear place, please refer to the video “RAY5 20W Quick Start Guide”. • Each unit of the engraving machine has been inspected and tested. Therefore, in some cases, very small traces may be left on the profile and the metal shell. These will not affect the quality.
www.longer3d.com 12 info@longer3d.
www.longer3d.com 13 info@longer3d.
www.longer3d.com 14 info@longer3d.
www.longer3d.com 15 info@longer3d.
C. Machine Operation (1) Focusing the Laser Module a) Place the machine on a flat table and make sure that the machine is stable and will not shake. b) Place the wood board to be engraved or cut under the laser. c) Loosen the two thumb screws on the front of laser head by hand. Then place the focus plate vertically on the bottom of the laser head form the rear side, and manually lift the laser head so that the bottom of the rear side of the laser is close to the upper surface of the focus plate.
(2) Power On a) Find the adapter and power cable and connect them. Please make sure the output of RAY5 20W adapter is DC 24V 5A. b) Connect the power cord to the power supply and connect the other end of the adapter to the power port of the motherboard. c) Connect the computer and the engraving machine through a USB computer (or insert a Micro SD card). d) Turn ON your RAY5 20W by press the power switch (To Turn OFF your RAY5 20W by press the power switch once again.
b) Adjustment page 50% laser power 5% laser power Turnoff laser c) Control page Unlock axis Set user Zero point Home to user Zero point Home to hard Zero point Move distance Move X Y axis Move speed User zero point refers to the position where the user manually confirms that the position of the laser head to the zero. While hard Zero point is the point determined by X and Y limit switch. d) Engraving page www.longer3d.com 18 info@longer3d.
e) Ready to engraving/cutting page Set user Zero position Work frame Start to engrave f) Engraving/cutting working page Working speed rate g) Set speed page www.longer3d.com 19 info@longer3d.
(4) Wi-Fi Control operation a) Tap tool icon on the home page b) Tap Wi-Fi icon on the top right corner of tool page Board: LGT RAY V1.2 Firmware: LGT RAY V1.1 c) Select Wi-Fi name on Wi-Fi list page d) Enter password and waiting for connect to the Wi-Fi you select. e) Check the current connected Wi-Fi status.(pay attention to IP address) www.longer3d.com 20 info@longer3d.
Wi-Fi name IP address Signal strength f) Enter the IP address in the browser of mobile phone or computer, then the control interface will pop up. g) Click SD File tag, it will change to SD file page. www.longer3d.com 21 info@longer3d.
h) Upload “.gcode/.nc” files generated by “LaserGRBL” or “LightBurn” software(The two software are introduced in the following sections). Then go and play! www.longer3d.com 22 info@longer3d.
(5) LaserGRBL Software Operation LaserGRBL is an easy-to-use and fully free software for laser engraver only running on Windows. Setup a) Find LaserGRBL software in attached SD card(path: /software), Or download from the link: https://lasergrbl.com/download/ b) After installing laserGRBL, power up the RAY5, press the power switch button, and connect the laser engraver and computer via USB cable. c) Open LaserGRBL, select correct port(depend on your PC), baud rate: 115200. Then click connect button.
Usage a) Main Interface b) Open file and set parameters www.longer3d.com 24 info@longer3d.
c) Start to engrave i. Place a board under the laser, then calibrate the laser. ii. Move the laser head to the place you want. iii. Click “Frame” button to check the work frame. iv. Click v. Or you can save gcode file to SD card by click “File” >> button to start engraving. “Quick Save” for offline working. www.longer3d.com 25 info@longer3d.
More help information about LaserGRBL, please refer to the link: https://lasergrbl.com/usage/ (6) LightBurn Software Operation LightBurn is professional software for engraver, a charging software running on Windows, MacOS, and Linux. It provides a trial period. You could pay for it afterward if you like it. Setup a) Find Lightburn software in SD card(path: /software) came with the package. Or just download from the link: https://lightburnsoftware.
e) Select Serial/USB and press “Next” button. f) Fill your Device Name, X, Y axis, then click “Enter” button Name: RAY5 20W X = 375 Y = 375 The max engrave size of RAY5 20W is different from RAY5 5W or 10W, so if you own RAY 5W or 10W before, please add the new engraver manually before using the RAY5 20W. www.longer3d.com 27 info@longer3d.
g) Select “Front Left” as your Origin X,Y and activate “Auto ‘Home’”, then click “Next” button. The automatic home function is turned on by default, if you do not want the automatically engraver home to when power on, it is recommended to turn off this function. h) Select RAY5 and press Make Default. Your RAY5 is ready to be used in LightBurn software. Usage a) Main interface www.longer3d.com 28 info@longer3d.
b) Select correct port (depends on your PC), then the RAY5 is connected to the computer. c) Click Menu “File” >> “Import image from disk.” Or just use draw tool on left column to design your own pattern. www.longer3d.com 29 info@longer3d.
d) Set the name, speed, maximum power, mode, and other parameters in the cutting/layer; (engraving function and cutting function are only different in speed, power. Normally, the cutting speed parameter is slower). e) After placing the board under the laser, click Frame to check the laser path whether is completely inside of the board. f) Click “Start” to start to work. g) Or you can save gcode file to SD card by click “Save GCode” button in Laser panel for offline working www.longer3d.
More help information about LightBurn, please refer to the link: https://lightburnsoftware.com/pages/tutorials (7) Firmware Upgrading The Firmware of RAY5 is continuously updated for fixing bugs and add new features. The firmware upgrade operations are different for different systems. The detailed tutorial about firmware upgrading is contained in the firmware package. Please download RAY5 firmware package from the LONGER official website: RAY5 firmware download Install the MKSLaserTool_setup V1.1.2.
Copy the dlc_cfg.txt file from the configuration folder to the root directory of the SD card, insert the SD card into the main board of the engraver, restart the engraver, and the configuration file update will be completed automatically. (8) APP Operation RAY5 can be controlled or engraved through MKSLaser APP when the engraver and APP are connected to the same WIFI. Please refer www.longer3d.com 32 info@longer3d.
to page 20 about the operation of connecting the engraver to WIFI. a) How to download the MKSLaser APP Please search for "MKSLaser" in Google play or app store or visit the address below to download Android system https://play.google.com/store/apps/details?id=makerbase.com.mks laser Please search for "MKSLaser" in the app store or visit the address below to download https://apps.apple.
c) Connect APP to WIFI When the RAY5 engraver is connected to wifi, we will get an IP address, click the connect button in the upper left corner of the APP, enter the IP address, and click CONNECT. d) Enter text or take a photo to engrave Take a photo Select photo from album Enter a text www.longer3d.com 34 info@longer3d.
Frame Engrave Click Creation, choose free drawing or input text, click Next, adjust the brightness and contrast, click Next, set the size, engraving speed, laser power (such as input 1000 for 100% power, and so on), click Frame to confirm the engraving range, click Engrave for working.
Pause www.longer3d.com 36 Cancel Set info@longer3d.
e) Control the engraver from APP Move to the positive direction of the Y axis Move to the negative direction of the X axis Move to the positive direction of the X axis Move to the negative direction of the Y axis Set move speed Choose the distance to move per step Turn on the laser Set user zero point Home to user zero point e) Engrave from SD files Click Graving on the home UI, the APP will read the engraving file in the SD card, select the engraving file, click Frame to determine the engraving range,
Set speed and power Cancel www.longer3d.com 38 info@longer3d.
Note: To use APP for engraving, it needs to insert the SD card into the motherboard firstly to ensure that the data can be received normally; otherwise it will prompt upload error. D. FAQ Question 1: Are there recommended engraving and cutting parameters? Please refer to the table “LONGER Laser Engraver Material Profiles” which describes the common materials engraving and cutting parameters for RAY5. If there is no information you need. Please wait for our updates in the future.
Question 3: How about the warranty policy? For LONGER official stores and LONGER designated distributors, RAY5 has a One-year International Limited Manufacturer warranty from the date of purchase of RAY5. Please note the following warranty terms. One-year International Limited Manufacturer Warranty means that LONGER will provide the following free warranty services: • Diagnostics and Evaluation. • Technical Support. • Replacement Parts under Warranty terms.
diagnostic steps might be required to identify the cause of the problem. 4. Some parts of the RAY5 inevitably “get used up” over time. For these parts, specific conditions apply, unless failure has occurred due to a defect in materials or workmanship. Part Motherboard Motor Longer Laser Module Touch Screen Power Adapter Chrome-Plated Rod 2020 Profile Coupling Eccentric Nut Bearing L-Shaped Right-Angle Foot Slot Goggles Brush Board\ Acrylic Board\ Stainless Steel Plate Linear Bearing Wheels GT2 Timing Belt
applies. This warranty is voided by: · Any damages caused by improper assembly of the product. · Any damage caused by improper use, maintenance, or operation of the engraver. · Any damage caused by long-term lack of maintenance. · Using the RAY5 in improper conditions (temperature, dustiness...). · Upgrades, modifications, or add-ons that are not officially supported.
Preparation: hex wrench, non-woven fabric, alcohol/isopropanol solution. Start: 1. Remove the laser hood and air guide 2. Dip a little alcohol/isopropyl alcohol solution with a non-woven fabric 3. Carefully wipe the laser lens with a non-woven fabric 4. Reinstall the laser hood and air guide Warning: Excess solution may immerse inside the laser and cause damage to the laser. Windows lens RAY5 20W laser module www.longer3d.com 43 info@longer3d.
Question 5: How to solve alarm 2 error or hard limit? It adds two limit switch in RAY5 20W laser engraver compared with RAY5 5W or 10W, the firmware has hard limit and soft limit features to locate the laser module position precisely. The position of the laser module is assumed to be the home position by default when powered on. So the engraver will trigger the alarm 2 or hard limit error if the laser head is moved in the X or Y negative direction at this time.
Thank you for purchasing LONGER products! Under normal usage and service, the products and its parts have a warranty period up to one year. If you encounter any problems, please send an email to support@ longer3d.com to report any issue with LONGER products. Our professional after-sale service would respond within 24 hours and help you to solve the issues. www.longer3d.com 45 info@longer3d.