
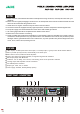
Instructions
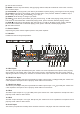

2. Mic1 Volume Control
This control determines the proportion of the MIC1 channel signal in the mix, and provides a visual indication
of channel vol.
3. Mic2/Line1 Volume Control
This control determines the proportion of the MIC2/LINE1 channel signal in the mix, and provides a visual
indication of channel vol.
4. Mic3/Line2 Volume Control
This control determines the proportion of the MIC3/LINE2 channel signal in the mix, and provides a visual
indication of channel vol.
1. Zone Volume Control
There are six rotatable band switches, to control six Zones volume in five steps. When they are setting to 0
position, Zone outputs are turned off.
11. The Led Indicator For Power, Fault, Peak, Signal And Level
When the power switch is turned on, the POWER LED will be illumed, so the user may be aware of it.
When the FAULT LED is illumed, means the device is damaged, so you must stop using it.
The PEAK indicator circuit monitors the output signal level. When it illuminates, means that the gain or EQ
boost should be reduced.
The signal LED lights when the output signal level reaches approximately -30dBu.
10-segment LED METER monitors output signal level.
10. Level Vol
Turn this knob to adjusts the final level of the Main output.
9. Bass Control
Turn this knob clockwise to boost low frequency. The control has a shelving response giving 15dB of boost or
cut at 100Hz.
8. Treble Control
Turn this knob clockwise to boost high frequency. The control has a shelving response giving 15dB of boost
or cut at 10kHz.
7. Aux3/Mp3 Vol
This control determines the proportion of the AUX3/MP3 channel signal in the mix, and provides a visual
indication of channel vol.
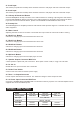
12. Mp3 Player With Bluetooth
6. Mic5/Aux2 Vol
This control determines the proportion of the MIC5/AUX2 channel signal in the mix, and provides a visual
indication of channel vol.
5. Mic4/Aux1 Vol
This control determines the proportion of the MIC4/AUX1 channel signal in the mix, and provides a visual
indication of channel vol.