EPC Dual-Band Reader Mode! MERCURY 2 Please read this document in its entirety before attempting installation of the MERCURY 2. It is important that you fully understand the installation procedure before powering up the MERCURY 2. WARNING DO NOT POWER UP THE MERCURY 2 IF ANY ANTENNA PORTS ARE UNCONNECTED. BOTH HF ANTENNA PORTS SHOULD HAVE TERMINATORS CONNECTED TO THEM AND BOTH UHF PORTS SHOULD HAVE EITHER ANTENNAS OR TERMINATORS CONNECTED TO THEM.
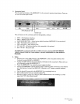
Connector Panel The only external interface of the MERCURY 2 is the connector panel pictured below. There are na user serviceable parts inside.
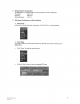
. Default Network Configuration The MERCURY 2 is shipped with the following default network configuration. 1P address: 10.0.0.101 Net mask: 2550.00 Default Gateway: 10.0.0.1 Web-based Configuration and Query Interface + Status Page Indicates the current status and configuration of the Tag. This is a read-only page. » Query Page This page provides a browser-based interface to the SQL query server running on the MERCURY 2. * Click "Query" to enter the query interface.
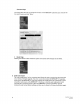
The EPC numbers of tags in the read field will appear in the main window and will remain there until the "Clear Output" button is clicked. Current date and time Antenna at which tag was seen Click “Stop” to stop the tag search, Click “Show Raw” to see the raw search output. This mode makes it easier to see when tags are being detected. Click "Hide Raw” {same button as “Show Raw") to switch back to the original mode To run a single search cycle, make sure that a tag search is not currently running.
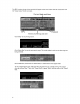
0840812ena 09-02 + Settings Page This page displays MERCURY 2 settings and allows the user to review and edit them. 0840812ena 098-02 Click “Save” to make the settings permanent. Do not exit the page until you see a confirmation message “New settings saved”. Changes are not permanent unless you see this message. pie * Network Page This page indicates the network setting and allows the users review and edit IP address, net mask, and default gateway.
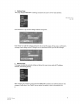
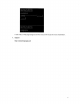
Firmware Page This page allows the user to rewrite the firmware on the MERCURY 2. Browse your computer for the new firmware and click “Enter”. Upload 17% complete (633451389169 bytes) & Reset Page Clicking the “Reset” button resets the system and causes saved changes to take effect. Safe mode button : The “safe mode button” on the connector panel allows the user to recover from any errors that occur during a firmware upgrade.
In safe made, all web page backgrounds will be red and will include the words "Safe Mode”, 7.