
Installation Guide


5
5
4
A
5
24
26
29
28
27
25
24
25
33
33
9R
9L
3
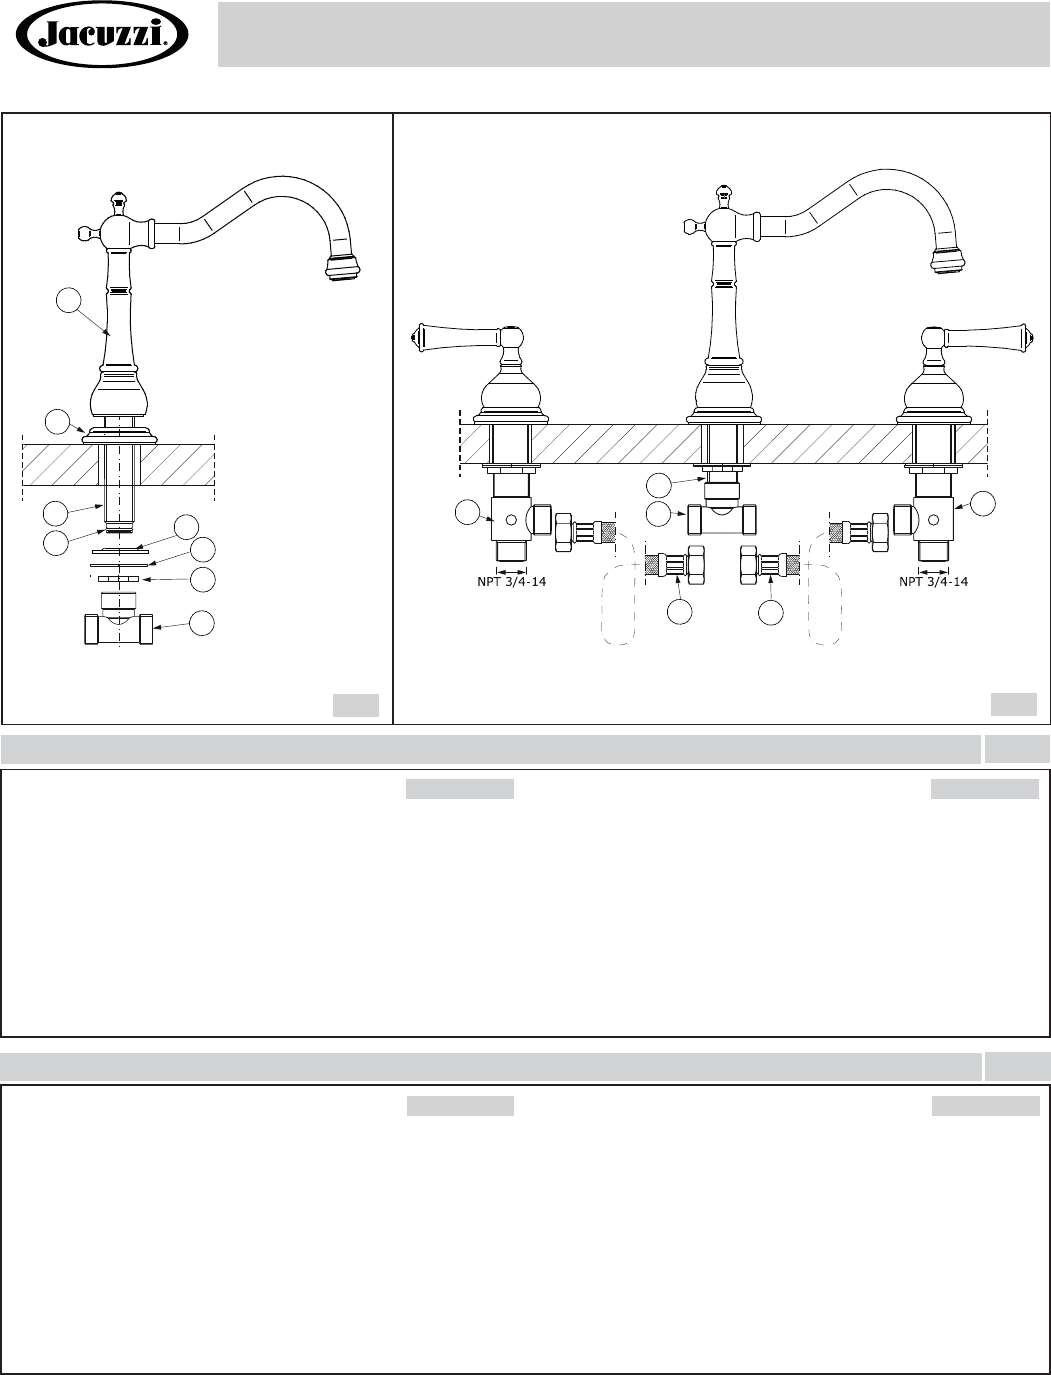
It is recommended that every 3-6 months (depending on water quality)
you remove the aerator (item 8, fig. 1) from the faucet spout (1) in order
to remove any impurities.
Una vez a 3-6 meses (dependiendo de la calidad del agua) se recomienda
quitar el difusor (pos. 8 dis. 1) del caño de la mezcladora (1) con el fin de
limpiarlo de todo tipo de ensuciamiento.
OPERATING INSTRUCTIONS LA DESCRIPCIÓN DEL FUNCIONAMIENTO
Water flow is turned on and adjusted using the handles. The faucet is fully
open when you turn the handles through a 90 angle (1/4 of a turn):
• clockwise – for the cold water handle located on the right,
• counterclockwise – for the hot water handle located on the left.
Water flow rate is adjusted within the quarter turn range.
Para abrir la salida y el ajuste de flujo de agua sirven los mangos.
Apertura total sucede como consecuencia de girar los mangos por el
ángulo de 90 (1/4 de giro):
• en la dirección de las manillas del reloj – en caso de mango del agua
fría colocado en la parte derecha,
• en la dirección opuesta a las manillas del reloj – en caso de mango
del agua caliente colocado en la parte izquierda.
Ajuste de flujo del agua sucede en 1/4 de giro.
See fig. 1
1.
2. Turn on hot and cold water supply valves and flush water lines for 15
1)
seconds .
3. Check all connections at arrows for leaks. Re-tighten if necessary, but
do not overtighten.
4.
1)
IMPORTANT: This flushes away any debris that could cause damage to
internal parts.
Ver la figura 1
1.
2. Abra las válvulas de suministro de agua fría y caliente y enjuague las
1)
lineas de agua por 15 seg. .
3. Chequee todas las conecciones para ver si hjay fuga de agua. Reajuste
si es necesario, pero no ajuste demasiado.
4.
1)
IMPORTANTE: Esto limpia los residuos que podrían causar daño a las
piezas internas con un chorro de agua.
4
AFTER INSTALLATION BEFORE USE
DESPUES DE LA INSTALACIÓN Y ANTES DEL USO
ENGLISH
~
ESPANOL
ENGLISH
~
ESPANOL
Remove body of aerator (7) , aerator insert (8)
and
turn faucet
lever handles all the way on.
Quite el aereador (7), el relleno del aerador (8 )
y
gire las manillas
a la posición de abierto.
Seguidamente remplace , el relleno del aerador (8)
y el aereador
(7)
.
Ajuste solamente con la mano .
Installation Instructions Instrucciones de Instalación
BARREA™
BARREA™
This faucet complies with NSF61/9, ASME/ANSI A112.18.1
and CSA B 125 Standards.
Este grifo se encuentra conforme con losestandares de NSF61/9,
de ASME/ANSI A112.18.1 y de CSA B 125.
ROMAN TUB SET
CONJUNTO BAÑERA ROMANA
IOG 2889.40
Next aerator insert (8) and body of aerator (7) .
Hand
tighten only.
replace
Rev. 1 January 2017