
Installation and Operating Manual

English
Arga™ Bathtubs
Installation Instructions www.jacuzzi.com Page 5
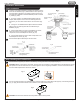
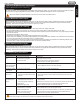
1
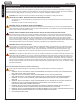
Install the metal drain/waste tting (supplied with the tub) into the
drain hole as illustrated (Fig. 2). Ensure that the drain opening on
the waste tting is situated in the integral overow channel. Use
the brass tting SS99000 & relevant MZ20000 pieces as needed
by model (Fig. 3a/b).
2
A - For Arga™ Classic: Use SS87000 ABS adapter with poly
adapter, brass tailpiece and nut from the drain alignment kit
included in your tub. These will be used for the conversion (Fig.
3a).
B - For Arga™: Use SS99000 brass tailpiece with the threaded
tailpiece from the drain alignment kit and install directly to
SS99000 (Fig. 3b).
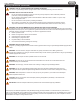
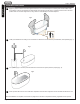
3
A - Cut the brass tailpiece to length. For SS87000 connection,
deburr and roll the cut edge with a swage tool. Install
components to the brass tailpiece as shown (Fig. 3a).
B - Cut the brass tailpiece to length. Install components to the
brass tailpiece as shown (Fig. 3b).
4
Glue the brass tailpiece assembly to the direct drain.
Drain Installation
After Installing the Finished Floor
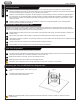
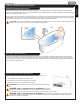
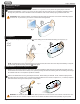
1
Place bathtub on supports (ex. blocks or 4x4 lumber), ensuring tub feet are fully supported (Fig. 4).
CAUTION: Bathtub comes factory pre-leveled, however it may be necessary to make adjustments to the levelling feet. These
feet operate in a manner similar to those of a home appliance. Prior to beginning installation, check to ensure that the tub is
level and make adjustments to the feet as needed.
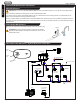
2
Connect the electrical plug to the dedicated GFCI-protected outlet and conrm tailpiece sits properly over drain alignment kit
(Fig. 5). Apply silicone to the bottom of tub to attach to oor when lowered in step 3.
CAUTION: Ensure that the skirt has been fully bolted on before moving further.
✓
Fig. 4
Installation Instructions
Fig. 3b
Fig. 5