
Installation & Assembly
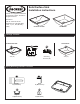

www.jacuzzi.com 4 Installation Instructions
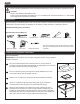
Check cut-out alignment by temporarily placing the sink (B1) over the desired mounting
position as illustrated (Fig. G).
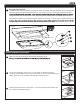
Apply a bead of sealing putty (not included) on the underside of the drain ange in
order to ensure a watertight seal between the sink (B1) and the drain. Remove any
excess putty after installing the drain onto the sink (B1). Refer to example (Fig. H).
Once you’ve checked the t and alignment, remove sink (B1) and turn upside down
as illustrated (Fig. I). Apply a generous amount of sealant (not included) around the
underside rim (B1) near the edge as illustrated (Fig. I). Lower the sink (B1) in place,
aligning with marks made earlier, and press down rmly. Allow sealant to set before
connecting supplies and drain (not included).
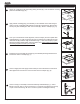
Install faucet (not included) and countertop (not included) following manufacturers’
instructions. Refer to example (Fig. J).
Connect supply lines and supply shutoff valves per the manufacturers’ instructions.
Hand tighten all connections for a secure seal. Refer to example (Fig. K).
Connect a trap (not included) to the drain assembly as illustrated (Fig. L). Hand
tighten to secure. Note: It may be necessary to cut off part of the tailpiece of the trap
or part of the horizontal leg. Be sure to secure all joints for watertight assembly.
Flange
Fig. H
Vessel Installation Instructions (Continued)
4
Countertop
Sink
Fig. G
Fig. I
Fig. J
Fig. K
B
C
Tailpiece
Trap
Fig. L
4
5
6
7
8
10