
Installation & Assembly

Installation Instructions 3 www.jacuzzi.com
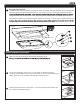
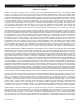
Epoxy Mounting Brackets
To install the sink using the supplied epoxy base brackets, thoroughly clean the underside of the countertop with
alcohol in indicated locations as illustrated (Fig. C). Use a thick epoxy (not included) and apply to the bottom
through the base holes for maximum contact. Allow the epoxy to properly set prior to installing the sink (A1).
Apply adhesive sealant (not included) around the topside rim of sink (A1) near the edge. Carefully raise sink (A1)
sink (A1) in place. Secure each bracket with a washer (DD) and wing nut (BB).
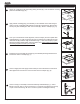
Make sure there is enough space between the backsplash, faucet,
If a cut out is necessary, trace a 5-1/4” x 5-1/4” square or diameter on the top
countertop surface. Make sure the rough-in dimension is 10-1/4” as illustrated (Fig. E).
Finally, drill a 1/4” to 1/2” clearance hole near the center of the trace.
Following the perimeter line made in step 2, cut out the opening for the sink (B1) into
the countertop as illustrated (Fig. F).
Undermount Installation Instructions (Continued)
AA
CC
DD
BB
Fig. C
A1
Apply Sealant Here
6
Fig. D
5-1/4”
13.33 cm
10-1/4”
26.03 cm
5-1/4”
13.33 cm
Fig. E
3
Fig. F
1
2
3
Vessel Installation Instructions