
Installation Sheet


j a c l o i n d u s t r i e s | 129 Dermody Street Cranford, NJ 07016
p 908.653.4433 f 908.653.1717
06.13.19
JACLO.COM
|
PG 3
MAINTENANCE
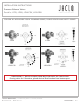
1. Close both hot and cold stop valves. Figure 2
2. Remove both the upper and lower cartridges. Figure 3
3. Replace lower cartridge, making sure arrow is pointing down. Figure 4
4. Replace upper cartridge. Figure 3
5. Reinstall trim ring and trim cap, then turn on hot and cold stop valves Figure 2 and check for leaks.
6. Reinstall the rest of trim (handle and faceplate - not shown).
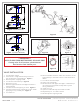
LIMIT STOP ADJUSTMENT (J-CSV & J-DIV-CSV)
1. Valve maximum should be set per applicable building code(s).
2. Open valve and run water at maximum temperature, measure water temperature.
3. If adjustment is required, turn off hot and cold water supply at stop valves. Figure 2
4. Remove trim ring. Figure 3
5. Remove upper cartridge. Figure 3
6. Remove limit stop. Figure 3
7. Reinstall limit stop to achieve desired maximum temperature setting:
a. Clockwise to lower temperature Figure 5
b. Counter clockwise to increase temperature Figure 5
8. Reinstall cartridge.
9. Reinstall trim ring.
10. Open valve stops.
11. Retest maximum water temperature.
12. Repeat adjustment if required.
TRIM INSTALLATION (FINISHED WALL IS COMPLETE)
1. Remove and discard plastic roughing shield.
2. Close hot and cold stops.
3. Remove brass trim ring.
4. Install decorative trim ring.
5. Mount gasket on back of faceplate. Figure 6
6. Install faceplate. Figure 6
7. Install diverter handle (if used).
8. Install valve handle.