
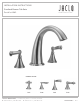
Installation Sheet

j a c l o i n d u s t r i e s | 129 Dermody Street Cranford, NJ 07016
p 908.653.4433 | 800.852.3906 f 908.653.1717 | 800.852.4133
CREATED 9.24.2015
JACLO.COM
|
PG 3
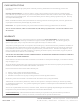
FIG. 4
HANDLE INSTALLATION (HANDLES VARY)
1. Handle trim T677 install with top screw into top of valve shaft, Fig.4
a. Remove index button and tighten screw.
b. Replace index button after it is tightened.
2. Handle trim T647, T639, and T646 install with set screw into side of valve shaft Fig.4
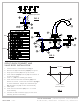
FIG. 1
2¼" to
Top of
Adapter
Deck
Cold Water
Inlet from ¾"
Deck Valve
Hot Water
Inlet from ¾"
Deck Valve
¾" Outlet to Roman Tub
½" Outlet to
Handshower
Stem
Nipple
Valve Nut
Diverter Valve (5)
3
4
1
2
2¼" to
Top of
Adapter
Deck
Cold Water
Inlet from ¾"
Deck Valve
Hot Water
Inlet from ¾"
Deck Valve
¾" Outlet to Roman Tub
½" Outlet to
Handshower
Stem
Nipple
Valve Nut
Diverter Valve (5)
3
4
1
2
2¼" to
Top of
Adapter
Deck
Cold Water
Inlet from ¾"
Deck Valve
Hot Water
Inlet from ¾"
Deck Valve
¾" Outlet to Roman Tub
½" Outlet to
Handshower
Stem
Nipple
Valve Nut
Diverter Valve (5)
3
4
1
2
2¼" to
Top of
Adapter
Deck
Cold Water
Inlet from ¾"
Deck Valve
Hot Water
Inlet from ¾"
Deck Valve
¾" Outlet to Roman Tub
½" Outlet to
Handshower
Stem
Nipple
Valve Nut
Diverter Valve (5)
3
4
1
2
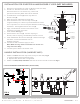
½" IPS coupling
Hot Water
Inlet
Cold Water
Inlet
9
7
8
6
* FOR ILLUSTRATION PURPOSES ONLY (STYLES VARY)
* *
INSTALLATION FOR DIVERTER & HANDSHOWER IF USED (NOT INCLUDED)
1. Remove trim and smaller top valve nut (1) from valve (not used)
2. Provide 1½" diameter hole in deck. Maximum
deck thickness is 2¼" for diverter only. Roman tub
spouts and valves may differ and must be checked.
3. Thread bottom valve nut (2) all the way down on
diverter valve (5).
4. Slide valve (from underneath) through deck.
5. Screw escutcheon onto valve until top of stem (3)
is approxmimately 2¼" above top of nished deck as shown.
This is important as it controls the space between handle and
escutcheon. Hand tighten bottom valve nut (2).
6. Apply a small bead of silicone to the bottom of the
escutcheon and install onto valve.
7. Install handle. See Fig. 4
8. Secure bottom valve nut (2). Connect coupling to
diverter, hose to coupling, and backow preventer to hose.
9. Install handshower deck mount sleeve (7). Slide hose through
the sleeve. Connect handshower hose to
backow preventer.
10. Connect hot and cold water supply to valve.
Note: Make sure any solder connections are at least 1½"
away from valve body.
11. Connect spout to bottom of diverter valve