
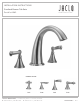
Installation Sheet

j a c l o i n d u s t r i e s | 129 Dermody Street Cranford, NJ 07016
p 908.653.4433 | 800.852.3906 f 908.653.1717 | 800.852.4133
CREATED 9.24.2015
JACLO.COM
|
PG 2
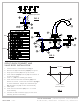
FIG. 2
FIG. 3
Adjust for specic handle
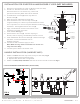
SPOUT QUICK CONNECT AND
VALVE BODY INSTALLATION
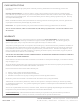
1. Conrm hole is in conformance with Fig. 1
2. Remove nut (17) and washers (15)(16) from spout.
3. Drop quick connect (13) from top of counter.
4. Install washers (15)(16) and nut (17) from bottom of
counter and tighten.
5. Install "T" (18) with suitable pipe sealant.
6. Install hot and cold valve assemblies (7)(8) from
bottom of counter. Install valve escutcheon (6) Fig.3
on valve assemblies. Adjust valve assemblies per
Fig. 3, tighten nut (11) on each valve assembly
7. Install spout
8. Install hot and cold hoses (12) from "T" to each
valve assembly.
9. Connect hot and cold water supply to each valve
assembly (bottom of assembly).
10" Max.
1-1/4"-1-3/8"
Diameter Holes
FIG. 1
TRIM
ROUGH