Dishmachine Component Maintenance Instructions Parker-Style Solenoid Valve Repair Kits 07610-003-05-39 A April 15, 2005
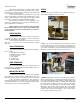
www.jacksonmsc.com Many Jackson dishmachines are equipped with electrical solenoid valves to allow for automatic fill and rinse. These valves are designed to specific tolerances and design aspects that must be met in order to function properly. Jackson offers repair kits for replacing some of the wear items associated with solenoid valves which will allow you to save money in that replacement of these parts can take place without removing the solenoid valve from the plumbing assembly.
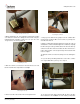
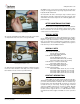
www.jacksonmsc.com Prying open the coil wire cover 4. When replacing the coil, ensure that when removing the coil wire cover that care is taken not to damage the wires inside. Using the medium flathead screwdriver, gently use it to open the cover enough to where it could be pulled off. Loosening the conduit nut 7. Using a pair of channel locks, gently loosen the conduit retaining ring for the conduit nut. Once it is loosened, use your fingers to unscrew and remove it. 8.
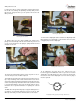
www.jacksonmsc.com to remove the valve in order to perform this and any further steps. Be careful not to damage the plumbing assembly. Only use the pipe wrench enough to where you can spin the valve bonnet off with your hand. Removing the diaphragm Removing the valve bonnet 13. Slowly remove the valve bonnet. Note: The spring for the plunger is located directly under the bonnet and may come free if you are not careful. Remove the plunger, spring and valve bonnet and place to the side. 17.
www.jacksonmsc.com 22. With the mesh screen removed, look down into the valve and verify it is not clogged. Remove any foreign objects from the valve body that would obstruct flow. 23. Reassemble the valve, reversing the steps needed to take it apart. Replace defective replacement parts with new parts from ordered kits. Ensure that components are sufficiently tightened to prevent leakage. AFTER MAINTENANCE ACTIONS Reconnect the incoming water (if disconnected) and turn on. Then restore power to the unit.