
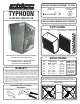
Product Manual
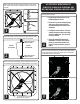

Center the fan body in wall opening. Using the holes indicated, secure fan
to framework with (12) fasteners (not provided) suitable for your structure.
3
Swivel top and side shutter clips open. Set bottom shutter flange between
housing flange and bottom shutter clips. Secure shutter by swiveling top
and side shutter clips over shutter flange.
5
Lift and tilt fan body as you insert fan into the rough opening. Fan is fully
inserted when flange rests flat against structure as shown below.
2
Flange must rest flat
against structure
Flange must rest flat
against structure
Interior
of structure
Exterior
of structure
Attach all (8) shutter clips with a rivet gun using (8) 3/16” rivets and (8)
3/16” backup washers. Review the illustrations below for placement and
assembly.
1
Connecting power to the unit.
• Install manual disconnect inside
building adjacent to fan.
• Route wire to motor with drip loop
and secure. Drip loop will drain
accumulated moisture away from
the motor.
• Configure internal wires to match
supply voltage and wire according
to motor nameplate. Test to verify
correct rotation.
• Shut off manual disconnect for
remainder of install. Only permit
power to unit when shutter and
guard is fully installed to prevent
injury.
4
ALL ELECTRICAL WORK SHOULD BE
COMPLETED BY QUALIFIED PERSONNEL AND
MEET NATIONAL, REGIONAL AND LOCAL CODES
1a
Fan
Flange
Shutter
Clip
Rivet
Backup Washer
1b
Rivet
Backup Washer
Fan
Flange
Shutter
Clip
Use (12) fasteners (not provided)
suitable for your structure.