
Manual


19
the magazine follower from moving the full length of travel.
It is preset for one round in the magazine without the plastic spring cap. You will
see a mark on the rod which is where you would cut the rod if you want two
rounds in the magazine without the plastic spring cap. If you want to use the
plastic spring cap and the duck plug you will have to cut the rod at the mark.
DIRECTIONS FOR DISASSEMBLY OF THE SEMI-AUTO
SHOTGUN:
1) Make sure the semi-auto shotgun is unloaded
(FOLLOW UNLOADING INSTRUCTIONS) and
pointed in a safe direction.
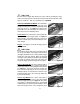
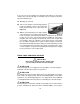
2) Make sure the cross trigger block safety is
engaged in the “on” or “safe” position. See Figure
33.
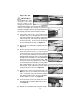
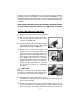
3) With the bolt in the forward position, unscrew the
fore end cap and remove the fore end. Push the
Carrier Stop Button rearward and move the bolt to
the rear slightly and hold it out of battery. Then
grasp the barrel and remove the barrel by pulling
the barrel and barrel extension out of the receiver.
See Figure 34.
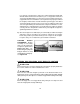
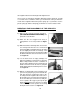
4) Use the back end of an empty cartridge or a
flathead screwdriver or your fingers to remove the
Bolt Cocking Handle. Insert the screwdriver or
back of empty cartridge into the notch and pry up
handle and remove from the bolt or grasp the
handle firmly and pull out and away from receiver.
See Figure 35.
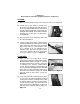
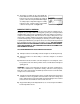
5) With the cocking handle removed from the bolt
you now can grasp the gas piston and slide the
bolt and action bar forward and remove the
assembly from the magazine tube and receiver.
Be careful because once the bolt is removed from
the receiver all the pieces from the assembly are
free to separate. We suggest you keep the gun
with the bolt up when you remove the assembly
so the assembly does not separate. See locking
block placement section. See Figure 36.
Figure 33
Figure 34
Figure 35
Figure 36