
Manual


14
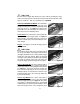
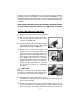
fore end cap securely in place, depress the carrier latch button and the bolt
will slide into the barrel extension (Note: If you see any portion of the barrel
extension protruding from the receiver after you released the bolt or if there is
a gap between the fore end and the receiver you have not properly assembled
the shotgun). If the bolt does not slide forward or you have gaps or the barrel
extension protrudes from the receiver, reverse the assembly procedures and
start over again making sure that the barrel is fully inserted into the receiver
and that the fore end is fully in place. If you still cannot assemble the shotgun
correctly, take the shotgun to the dealer where you bought the shotgun or a
qualified gunsmith for assistance.
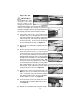
8) Once the shotgun is assembled (or if you can not fully assemble the shotgun
and plan to carry it somewhere for assistance) activate the cross trigger
block safety and keep it activated until you are ready to fire the shotgun.
Keep the safety “on” no matter if the gun is loaded or unloaded.
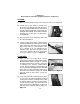
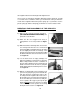
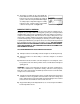
LOCKING BLOCK
PLACEMENT: During
assembly or reassembly
make sure the locking lug
is in place as pictured. See
Figure 22a. Make sure
that the firing pin spring and
firing pin washer are held
rearward by the locking lug.
See Figure 22b.
LOADING AND UNLOADING YOUR SEMI-AUTO SHOTGUN
W A R N I N G
Never load or fire the semi-auto shotgun unless the barrel is properly attached to
the receiver, and the fore end is locked into the receiver.
W A R N I N G
Make sure the semi-auto shotgun is pointed in a safe direction and the cross
trigger block safety is engaged at all times while loading and unloading. NEVER
allow your finger or other objects to contact the trigger while loading or unloading.
W A R N I N G
Do not disengage the cross trigger block safety until you are ready to fire and
have the shotgun pointed safely downrange.
Figure 22a
Figure 22b