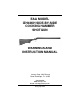
EAA MODEL IZH43KH SIDE-BY-SIDE COCKING HAMMER SHOTGUN WARNINGS AND INSTRUCTION MANUAL ArmoryAmerican Corp. 402 Richard European Armory Corp. Road FL. 32955 3855Rockledge, North U.S. Highway 1 Cocoa, Florida 32926 (321) 639-4842 www.eaacorp.com E-mail: eaacorp@eaacorp.
EAA MODEL: IZH43KH SIDE-BY-SIDE COCKING HAMMER SHOTGUN WARNINGS AND INSTRUCTION MANUAL PLEASE READ THESE INSTRUCTIONS MODEL NUMBER IZH43KH BARREL LENGTH 20" TYPE SIDE-BY-SIDE SHOTGUN GAUGE 12 FINISH BLUE / NICKEL CASE COLOR GENERAL INFORMATION: Weight (average) - 20" = 6.3 Lbs Overall Length - 35.8" FOR YOUR SAFETY AND THE SAFETY OF OTHERS, this owner’s manual contains important warnings, instructions and safety procedures which must be understood BEFORE using this firearm.
WARNING! **YOU RISK PERSONAL INJURY OR DEATH BY HANDLING THIS FIREARM** Before handling any firearm, make sure you know the safety procedures and most importantly, keep the firearm pointed in a safe direction. Before handling this firearm, read, understand and follow the instructions in this manual. Always keep this manual with the firearm. If you lend, give or sell this firearm, be sure the manual goes with it.
Type Of Ammunition To Be Used It is suggested that high quality commercially manufactured ammunition be used in this firearm. Avoid military surplus or old ammunition as it may not fire with sufficient force to expel the projectile or wad from the barrel. The use of reloaded, high pressure or hand-loaded ammunition can be dangerous and will void the warranty.
FOLLOWING THESE SAFETY RULES CAN SAVE YOUR LIFE OR THE LIFE OF SOMEONE ELSE Get competent firearms instruction in safe handling before using this firearm. Please ask your dealer for names of qualified instructors near you. All guns are extremely dangerous if carelessly handled or used. Remember that the firearm user is the primary “safety” and that reliance on any mechanical safety device should never replace safe handling procedures.
FOLLOWING THESE SAFETY RULES CAN SAVE YOUR LIFE OR THE LIFE OF SOMEONE ELSE Never leave a gun unattended or where it could fall. Store guns and ammunition separately beyond the reach of children. Make sure that they are properly secured so untrained individuals and children will be denied access to your guns and ammunition. Test your gun’s operation and safeties only at a shooting range while the firearm is pointed in a safe direction. Know your target and what is beyond.
FOLLOWING THESE SAFETY RULES CAN SAVE YOUR LIFE OR THE LIFE OF SOMEONE ELSE Spectators should be at least 10 feet behind and away from the shooter while the shooter is loading, shooting and unloading. Spectators should wear ear and eye protection and they should avoid distracting those shooting their firearms. Never drop your gun. If you do drop it, unload it and check it for proper function before using it again. Do NOT alter or modify your gun.
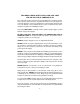
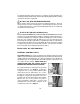
Use the Security Lock Provided with your Shotgun This shotgun comes with a security lock to assist in protecting against unauthorized use. See Picture A. The shotgun must be unloaded when the security lock is in place on the shotgun. WARNING: Using the security lock cannot substitute for securing your firearm and ammunition in separate, locked locations. The security lock operates as follows: 1. To open the Trigger Lock put the Key into the notches of the Trigger Lock Nut and unscrew it counterclockwise.
USED FIREARMS - Firearms are sometimes altered to work incorrectly, or parts may be removed, lost or replaced with incorrect parts. If you got your European American Armory Corp. firearm as a used gun, BEFORE USING IT you should take it to a good gunsmith who knows European American Armory Corp. firearms, and have him examine it. WRITE EUROPEAN AMERICAN ARMORY CORP.
any unburned powder grains from the bore, chambers and mechanism before resuming shooting. If the blockage cannot be dislodged by tapping it with a cleaning rod, take the firearm to a gunsmith. W A R N I N G (EYE AND EAR PROTECTION) When shooting, full eye and ear protection is mandatory at all times. Shooters and spectators must wear shooting glasses and hearing protection to prevent eye injury and hearing loss. Vision and hearing impairment can occur with only one moment of non-protection.
WARNING Do not touch the trigger(s) while moving the safety. When operating the safety, make sure you push or pull it to the full extent of its travel in the desired direction, either fully “on” or fully “off.” Half-safe or partially-safe is UNSAFE. WARNING The shotgun is designed to and WILL FIRE when the trigger is pulled and the safety mechanism is in the “off” or “fire” position. Top Lever: The top lever is located just forward of the safety mechanism. See Figure 8.
WARNING Never fire a double-trigger shotgun by using two fingers because you may inadvertently pull both triggers at the same time resulting in a near simultaneous firing of both barrels. Use your index finger to pull one of the triggers to fire the first shot. After that shot is fired, release the trigger and move your index finger to the other trigger to fire the second shot.
Directions For Assembly Of Shotgun: WARNING Before you begin to assemble the shotgun, you MUST (1) look down the barrels from the breech end toward the muzzle end to make sure there is no ammunition in the chambers or obstructions in the barrels, and (2) make sure the safety is in the “safe” position. Your shotgun was shipped with the barrel assembly (barrels and fore end) detached from the receiver assembly.
reattach the fore end to the barrels. Pull outward on the mechanical latch in the center of the fore end and place the fore end on the receiver. With an upward swinging motion, lock the fore end onto the barrels. Do not force the fore end into its locked position on the barrels. If the latch does not go to its final flat position, it may be necessary to push it into place. Never force the latch into the flat position. See Figure 18.
Figure 21. Then close the action by swinging the barrels up until they lock into the receiver and the top lever moves back to the center position. If the top lever does not move to the center, break open the action again and check to see if the shot shells are fully seated in the chambers. If the shells are fully seated, then re-close the action. Figure 21 If the shot shells are not fully seated, check the chambers for blockage and check the shells for deformation and retry closing the action once more.
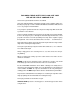
COCKING AND UNCOCKING YOUR SHOTGUN TO COCK: 1) While keeping your fingers away from the triggers, grab the shotgun firmly with your right hand around the stock’s pistol grip. Place your right thumb on the top of the right hammer. See Figures 23a and 23b. 2) Pull the hammer rearward until it locks in the cocked position. See Figure 24. Figure 23a Figure 23b Figure 24 3) Next, place your right thumb on the left hammer and pull it rearward until it locks in the cocked position. See Figure 25.
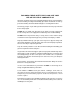
3) Place your thumb on the top of the right hammer. Holding the hammer firmly, pull the front trigger and slowly lower the hammer to its resting position. Repeat this step with the left hammer. See Figures 28a and 28b. Figure 28a Figure 28b FIRING YOUR SHOTGUN WARNING Never load a cartridge into the chamber until you are ready to fire the shotgun. WARN ING Do not disengage the trigger block safety until the shotgun is pointed in a safe direction and you are ready to fire.
2) Make sure you are wearing eye and ear protection. 3) Keep your fingers away from the trigger(s). 4) Cock hammers per Cocking Instructions. 5) Push the trigger block safety to the “off” or “fire” position with the red dot showing. See Figure 29b. Figure 29b 6) With the butt stock held firmly again your shoulder and the barrels pointed towards your intended target, place your trigger finger on the trigger. The shotgun will fire when you pull or squeeze the trigger with the requisite force.
MANUFACTURER’S WARNING: This firearm was manufactured to properly perform with the original parts as designed. It is your duty to make sure any parts you buy are correctly installed and that neither replacements nor originals are altered or changed. Your gun is a complex tool with many parts that must relate correctly to other parts for safe and accurate operation. Putting a gun together wrong or with modified parts can result in a damaged gun, or personal injury or death to you or others.
H) A gun should be cleaned after firing. In addition, external parts should be wiped with an oiled cloth after handling. A light oil is ordinarily all that is necessary in cleaning if the gun has not been fired or fired very little. If a gun is used frequently, it must be cleaned after each firing and regularly serviced by a professional gunsmith. If the gun has been stored, remove all excess oil and/or grease before firing.
due to use of high velocity, high pressure, reloaded or other nonstandard ammunition, or any unauthorized repair, modification, misuse, abuse, or alteration of the product are not covered by this Limited Warranty. Any implied warranties, including the implied warranties of merchantability and fitness for a particular purpose, are limited to one year from date of original retail purchase. Consequential or incidental damages and/or expenses, or any other expenses are not covered by this warranty.
OPTIONAL CHOKE TUBES Warning: Never install or remove choke tubes while the firearm is loaded. Only install or remove choke tubes with the firearm unloaded, the action open and the trigger block safety engaged.
F) Keep choke tubes lubricated and installed. Never fire the gun without a choke tube installed. Handle choke tubes carefully since the leading edge is very thin. Notes on Shot Material and Chokes: 1) Shells using Bismuth or Tungsten-Matrix shot are subject to the same barrel and choke tube limitations as lead shot. Shells using TungstenIron shot or Hevi-Shot are subject to the same barrel and choke tube limitations as steel shot.
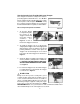
IZH43KH EXPLODED PARTS VIEW IZH43KH PARTS LIST 1. Barrel assembly 2. Stock swivel base 3. Extractor pin 4. Woodscrew 5. Extractor 6. Screw 7. Swivel pin 8. Swivel loop 9. Screw 10. Barrel swivel base 11. Front sight 12. Fore end 13. Fore end bush 14. Spring 15. Catch housing 16. Fore end catch 17. Pin 18. Screw 19. Screw 20. Screw 21. Screw 22. Washer 23. Butt plate 24. Hinge 25. Stock 26. Safety spring 27. Receiver 28. Cam 29. Cam pin 30. Sear pin 31. Sear, LH 32. Left hammer base 33. Plug 34.
! WARNING Children are attracted to and can operate firearms that can cause severe injuries or death. Prevent child access by always keeping guns locked away and unloaded when not in use. If you keep a loaded firearm where a child obtains and improperly uses it, you may be fined or sent to prison. ! ADVERTENCIA A los ninos los atroen las armaside de fuego y los pueden hacer funcionar. Ellos pueden causarses lesiones graves y la muerte.