
Installation Guide

Install overview:
1. Mix the mortar according to instructions.
2. Clean the substrate with a damp sponge.
3. With the at side of the trowel, “burn” the mortar into the substrate.
4. Trowel material onto the oor or wall with the appropriately sized trowel in a consistent direction,
leaving a ridged setting bed.
5. Lay the tile in the mortar and atten the mortar ridges by pushing the tile perpendicular to the
trowel direction.
6. Install spacers or wedges as needed.
7. Make sure grout joints are clean.
8. Pre-seal the tiles. This step will help your tile avoid the absorption of grout pigment. We recom-
mend the Laticrete BulletProof Sealer.
9. Let the system cure fully before grouting, usually 24 hours.
Installer Tech Tips:
• Don’t work too far ahead. Make sure that the mortar stays fresh and has not skimmed over.
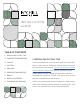
• Mosaic tile sheets can be offset to hide some sheet joints.
• Use a beating block or grout oat to set your mosaic tile.
• Take a step back and make sure the size of the perimeter joints between sheets is the same as
the joints within each sheet. If you can make out the individual sheets, you may need to adjust
them by removing tiles from the edge to bridge the gap.
• Minimum mortar coverage should be evenly distributed and cover 80 percent of tiles in dry
areas and 95 percent in wet areas. Once you set tiles, pull up a couple to check for proper cov-
erage.
• Choose the appropriate grout joint size; remember, smaller is not always better. Grout joint size
depends on how consistent the edges of your tile are.
• For proper directional troweling: https://www.youtube.com/watch?v=Way5bMh-eYg&t=31s
7. GROUT
Grout can make or break a new tile project. A great grout job can aesthetically enhance a project,
while a poor one can undermine even the best work.
Both sanded and non-sanded grouts are acceptable for use in most cases. We recommend sanded
grout for joints larger than 1/8 inch and non-sanded for 1/8 inch or smaller. Non-sanded grout that