
Installation Guide

4. CUTTING
Use a glass cutter (score and snap) with a new diamond wheel for best results when cutting
glass tiles. Wetting the diamond wheel with oil before cutting will produce the smoothest cuts.
In some cases, it may be possible to use a wet saw with a new, continuous-rim diamond blade
specically designed for cutting glass. To cut angles without a wet saw or grinder, drill a small
hole at the apex of the angle prior to cutting. In most cases, this will allow the use of a score
and snap cutter and avoid small cracks that can happen at the angle. Cut edges and corners will
be sharp. Edges can be sanded after cutting.
5. DRILLING
If possible, drill holes before installing tile, and if the hole will be visible after installation, drill from
both sides to ensure a cleaner nish. Use a new diamond coring bit (for large holes) or a spade bit
(for small holes) with a diamond tip made for glass drilling for the best results. Lubricating the bit
and tile surface with a continuous spray of oil/water mix will prolong the life of bits and provide a
better-nished edge. When possible, the use of a jig will ensure precise placement of holes to be
drilled. When drilling holes for anchoring bolts, provide a minimum of 1/8 inch clearance around
the tile to prevent cracking due to disparate expansion and contraction rates or stress transfer.
6. ADHESIVES AND MORTAR
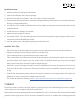
Make sure to use the proper directional troweling techniques and proper trowel size. To achieve the
appropriate coverage, refer to the trowel chart below:
Longest Edge Measurements
Tile Size
Suggested
Trowel Size
Mosaic Tile 1/8” x 1/8”
2” through 3” 1/8” x 1/8”
3” though 6” 1/4” x 1/4”
6” through 12” 1/4” x 3/8”
12” though 24” 1/2” x 1/2”
If you are installing tile with any edge greater than 15 inches, be sure to use a large-format mortar
specically made for large and heavy materials.