
Installation Guide


Use an awl or screwdriver to tap down through plank/tile on scored triangle cut points.
Lift and remove damaged tile.
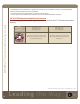
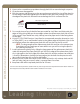
With the pattern side facing up on the new replacement plank/tile, trim o the short lip
on the tongue side and the groove on the compression joint side, making it ush with
the edge of the plank/tile. Be careful not to damage the nish surface of the tile.
Cut several pieces of acrylic double face tape made for vinyl oors and slide under the
edges of the existing oor on the two edges where the replacement plank/tile will have
its lips cut o. Tape should face sticky side up; leave the paper on the side facing down
on the oor.
Using IVC FLEX-SEAM Premium Seam Bond, or an approved secondary alternative (such
as Taylor 2062*), run a small bead of sealer on the groove edge of the planks/tiles on the
existing oor where the replacement plank/tile will rest that has the lips cut o.
• The long tongue of the replacement plank/tile and the uncut compression
t end joint will not need tape or seam adhesive as you will be using the plank’s/
tile’s locking mechanism.
Install replacement plank/tile by sliding the long groove of the replacement plank/tile
under the tongue of the oor plank/tile until the nish edge of the replacement plank/
tile is tight against the nish edge of the oor plank/tile, and the compression end joint
is lined up. Rotate down, locking the long tongue joint and roll the compression end
joint to lock into place with a small or hand roller.
Wipe any excess sealer that comes to the surface of the tiles with a damp cloth and fol-
low with a dry cloth to assure all sealer is removed from tile surface.
Keep foot trac o the replaced plank/tile for 24 hours.
*IVC will not be held responsible for problems that may arise for approved secondary alternative seam sealers. Please con-
tact the approved secondary alternative seam sealer’s manufacturer with issues.
Leading the Way
This document is reviewed on an ongoing basis. Control #: MKF_0006_0 8/2/2013
Pattern side up
Short lip on tongue side
Groove on
compression
joint side
Residential Installation Guide – LVT Click