
Installation Guide


• Undercut doorjamb so the ¼ inch expansion space is maintained, allowing the LVT to slip
under doorjamb/case molding.
• Sweep the suboor clean. The oor must also be free of all contaminates.
PLEASE NOTE warranty exclusions with respect to rolling loads. If you have frequent or
heavy rolling conditions, click products can be glued down to help reduce the risk of joint
separation from rolling load trafc; however our warranty still excludes any problems associ-
ated with rolling loads.
It is the installer’s responsibility to inspect the ooring prior to installation to ensure that
there are no visual defects. Do not install ooring with visible defects. If visible defects are
present, contact your retailer immediately.
• Floor must be clean, smooth, at and dry before installation.
• Check the tongue and groove to assure it is free of debris or damage.
• To achieve maximum appearance, mix planks from two to three cartons from the same
production.
The advantage of LVT Click product is that it allows you to choose your own starting posi-
tion, direction and can work one plank/tile at a time.
Walls are not always straight. Snap a chalk line for your rst row to follow.
Maintain a 1/4” (1/2 cm) expansion space around all walls. Quarter round or baseboard
molding will cover this expansion space. : Maintain the ¼ inch space around
cabinets, pipes, toilet anges and any obstacle in the oor.
• For , we recommend staggering the end joints a minimum of 6 inches.
• For , we recommend staggering the end joints a minimum of 3 inches.
, as this will not provide a stable installation.
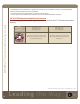
To click the end joint of the plank/tile together, click the short side of the plank/tile vertically
into the previous one by pressing it by hand and rolling it with a hand roller or seam roller
to ensure a fully compressed tight t.
To click the length joint of the plank/tile together, place long joint together, lifting slightly
to engage lock. Rotate downward, clicking together for a tight t. Use a small hand roller or
seam roller to press/lock the compression t end joint.
If there are any gaps, we recommend using a small scrap piece of plank/tile with the lock on
the edge. Lock groove-to-tongue or tongue-to-groove for this application. Lock the scrap
piece to the area requiring tapping, and lightly tap the edge of the material. This will bring
the tile edges tight together.
Leading the Way
This document is reviewed on an ongoing basis. Control #: MKF_0006_0 8/2/2013
Residential Installation Guide – LVT Click