
Use and Care Manual


17
ASSEMBLY
ASSEMBLY
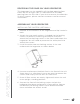
1. Make sure that the shut-o valve is closed (it should be
horizontal when closed, vertical when open), and then slowly
turn the main valve on the CO tank counter-clockwise until it
is fully open.
2. Open the shut-o valve, allowing gas to flow into the keg.
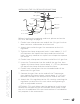
3. Release the adjustment lock nut, located behind the regulator
screw, by turning it clockwise about 5-7 turns.
4. Turn the regulator screw clockwise to increase the pressure.
You should see the needle on the pressure gauge climbing as
the pressure increases. The ideal pressure level is between 10-
12 PSI.
5. When the gauge reaches the correct pressure level, tighten
the adjustment lock nut by turning it counterclockwise.
6. Allow several minutes for the keg to pressurize. The gauge
may drop in pressure as this process completes; if this
happens, you may need to release the adjustment lock nut
and adjust the regulator screw to reach the correct pressure
level again, then retighten the adjustment lock nut.
NOTE: Make sure to listen for a hissing sound at all
connections to ensure that there are no leaks.
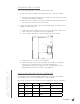
7. Once the keg has fully pressurized and the pressure gauge
is stable between 10-12 PSI, plug the kegerator into a 120V,
60Hz, 15A grounded outlet.
CONVERTING THE KEGERATOR TO A GENERAL
REFRIGERATOR
1. Turn the control knob to the OFF position.
2. Close the main valve on the CO canister.
3. Close the secondary shut-o valve on the regulator pipe.
4. Close the connection between the beer keg and the keg
coupler.
5. Drain any remaining beer from the lines.
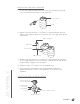
6. Disconnect the beer line and CO air line from the keg
coupler.
7. Remove the beer keg and the bottom metal plate from the unit.
8. Remove the keg coupler.
9. Disconnect the air line from the CO canister.