
Use and Care Manual


14
ASSEMBLY
ASSEMBLY
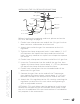
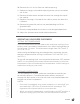
INSTALLING THE CO REGULATOR AND TANK
Before installing the regulator and tank, please review the
CO Gas Warnings on page 6.
1. Feed a hose clamp over one end of the CO gas line that
does not have a connector on either end.
2. Attach that end to the gas line connector on the CO
regulator.
3. Tighten the clamp to prevent leaks. Leave about ½" (1.27
cm) between the top of the clamp and the end of the
hose. You may need to use a pliers or crimper to squeeze
the clamp.
4. Feed a hose clamp over the other end of the CO gas line.
5. Insert the T-connector into the end of the gas line, then
tighten the hose clamp. Leave about ½" (1.27 cm) between
the top of the clamp and the end of the hose.
6. Feed a hose clamp over the non-threaded ends of the
other two CO gas lines.
7. Connect the gas lines to the ends of the T-connector,
then tighten the hose clamps. Leave about ½" (1.27 cm)
between the top of the clamp and the end of the hose.
8. Attach the CO regulator to the CO tank by screwing the
regulator nut onto the CO tank valve and tightening it
with an adjustable wrench.
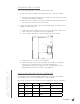
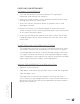
OPTIONAL: This unit allows you the option to install a tank
retainer on the back of the unit to allow extra space inside
the unit. An additional CO rear tank retainer is included for
this purpose in the accessories.
CO2 gas
lines
T-connector
Hose clamp
Hose clamp
CO2
gas
line
Hose
clamp
Gas line connector
CO2 regulator
CO2 gauge
Hose
clamp
Tank valve
Regulator nut
CO2 tank
CO2 tank
retainer