HEMOCHRON Whole Blood Microcoagulation System Operatorʼs Manual English TABLE OF CONTENTS INTENDED USE.......................................................................................... 2 SUMMARY AND EXPLANATION .............................................................. 2 PRINCIPLES OF OPERATION................................................................... 3 DESCRIPTION ............................................................................................
INTENDED USE The HEMOCHRON Signature Elite® Whole Blood Microcoagulation System is a battery-operated, hand-held instrument that performs individual point-of-care coagulation tests on fresh or citrated whole blood. These tests include: Activated Clotting Time (ACT+ and ACT-LR), Activated Partial Thromboplastin Time (APTT and APTT Citrate), and Prothrombin Time (PT and PT Citrate). The system is intended to be used only with test cuvettes that are available from ITC.
The HEMOCHRON Jr. PT test measures the extrinsic coagulation pathway and is sensitive to coagulation factors VII, X, V, II, and fibrinogen. PT results may be abnormal in patients with liver disease or Vitamin K deficiency. The test is widely used to monitor oral anticoagulant therapy. The PT test is a unitized test system utilizing a highly sensitive thromboplastin for improved specificity and sensitivity. The HEMOCHRON Jr.
Definitions and Terms The following acronyms and abbreviations are used in this manual, instrument screens, and printouts: ACT APTT CVlot DB EQC HCM INR idms LQC OID PID PIN POCC PT QC QClot TQC Activated Clotting Time Activated Partial Thromboplastin Time Cuvette Lot Number Database Electronic Quality Control (System Verification) HEMOCHRON Configuration Manager International Normalized Ratio Integrated Data Management System Liquid Quality Control Operator Identification Number Patient Identification Num
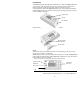
DESCRIPTION The HEMOCHRON Signature Elite instrument is a hand-held device. It contains a test chamber which warms a test cuvette to the required temperature, and it performs all operations to measure the clotting time of a whole blood sample after it is placed in the test cuvette and the test is started by the operator. Operator instructions are shown on the display panel, and the operator enters commands and information using the keypad.
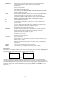
PRINT/SCAN NOTE ID QC DATABASE 0 through 9 CANCEL ENTER Print results on an external printer for the last test result, patient database, quality control database, or all test results for a specified patient. Test the printer. Enter a customized header. Print instrument system information. Scan a barcode ID when Enter PID, Enter OID, Enter PIN, Enter CVLot, Enter QCLot, or Scan Lot is displayed.
Menus The action keys are used to display and activate various commands for operating and configuring the system. The principal menus are shown below: Menu Commands Access Main Menu Press the 0 (zero) key when no tests are running and no other menu is active. Configuration Menu Press the 6 key while the Main Menu is displayed. Supervisor Menu Press the 5 key while the Configuration Menu is displayed, enter the supervisor PIN at the prompt, then press and hold the Enter key.
Menu Commands Access Print by Patient Menu Press the 4 key while the Print Menu 1 is displayed. Print by QC Menu Press the 5 key while the Print Menu 1 is displayed. Print/Scan Menu 2 Press the 7 key while Print Menu 1 is displayed. Database Menu Press the DATABASE key. Execute a command on a menu by pressing the action key for that command. For example, if the Main menu is displayed, press the 4 key to shut down the system, or press the 5 key to display system information.
Test Cuvettes Tests are performed with single-use disposable HEMOCHRON Jr. test cuvettes. Each test cuvette contains a label, a sample well, a test channel containing reagents, an enclosed waste reservoir, and one or more optical detection windows. label test channel sample well detection window overflow area The cuvette label is human- and instrument-readable.
Instrument Lockouts The instrument can be configured to allow use only by authorized operators and/or to allow use only if specified QC has been performed. If one or more of these lockouts is enabled, processing of the lockout(s) occurs before any other instrument functions. Prewarming If the lockout checks are passed, a cuvette is automatically prewarmed to 37 °C ±1.0 °C when it is placed in the test chamber. The instrument will sound one short beep when pre-warming is complete.
IMPORTANT LABELS AND SYMBOLS Serial Number Label A serial number label on the rear of the HEMOCHRON Signature Elite instrument alerts users to the following: Class 1 Barcode Scanner Class 2 Barcode Scanner CAUTION: This manual provides safety instructions for instruments equipped with class 1 or class 2 barcode scanner lasers. Please refer to the back panel of the instrument to identify the class of laser and follow appropriate instructions provided in this manual. 1.
Other Symbols Before using the HEMOCHRON Signature Elite system, it is essential that the contents of this Operator’s Manual, any labels on the instrument or its packaging, and instructions accompanying HEMOCHRON Jr. cuvettes are read and understood by the operator. These materials make reference to additional symbols that are explained below: Handle with care. Handle and open the container with care.
SPECIFICATIONS Specifications for the HEMOCHRON Signature Elite Whole Blood Microcoagulation System are listed below. Dimensions and Weight Depth 9.4 cm (3.7 in) Width 19 cm (7.5 in) Height 5 cm (2.0 in) Weight 0.53 kg (1.2 lbs) Performance Test Precision ≤ 10% C.V. for whole blood samples Operation Test Chamber 1 Timing Range 0 second to 1005 seconds Incubation Temperature 37 °C ±1.
PREPARING THE INSTRUMENT Unpacking and Inspection Note: Inspect each component for damage when unpacking. If damage is observed, contact your shipper or service representative immediately. 1. Remove any protective packaging that may be present around the instrument. 2. Examine the packaging material to be sure that the power supply, connecting cables or other components have been removed. The materials that are provided are listed below. Note: Do not discard the packaging material.
Battery Warnings The message CHARGE BATTERY is displayed intermittently when the remaining battery power is insufficient to ensure test completion. The message BATTERY FAULT is displayed when the battery is completely discharged and cannot be used to run additional tests. The AC/DC Power Module must be used for additional tests until the battery is recharged.
4. 5. 6. Enter the new time using the numeric keys. Note: Use the 24-hour format (i.e., enter 15:30 for 3:30 pm). The leading zero is required for single digit times (i.e., enter 06:30 for 6:30 am). Press and hold down ENTER. Stored is displayed and the entry is saved. Press CANCEL to return to normal operation. To Set the System Date: 1. Press and hold START to turn on the instrument. 2. Press 0 (zero) to display the main menu. 3. Press 3 to display the date: 4. 5. 6.
Configuring Display Brightness, Contrast, and Illumination The brightness and contrast of the display can be adjusted and the length of time that the display remains illuminated after a test is completed or a key is pressed can be set. 1. 2. 3. Press and hold START to turn on the instrument. Press 0 (zero) to display the main menu. Press 6 for the Configuration menu: To Adjust the Display Contrast: Display contrast can be set so characters are darker (more contrast) or lighter (less contrast). 1.
Displaying Available Languages English is the only language that is available in HEMOCHRON Signature Elite software. Additional languages will be available in future software versions. To Display the Menu of Available Languages: 1. Press and hold START to turn on the instrument. 2. Press 0 (zero) to display the main menu. 3. Press 6 for the Configuration menu: 4. Press 4 to display the menu of available languages: 5. Press the numeral key that corresponds to the language to be used.
Scanning Lot Information for Cuvettes or Quality Control Materials 1. On the Supervisor menu, press 1 to display the Scan Lot screen: 2. Hold the instrument over the barcode on the cuvette wrapper or QC package: (cuvette wrapper) barcode (QC package) barcode 3. 4. Note: Position the scanner port of the instrument approximately four inches from the barcode (see page 5). Press PRINT/SCAN to scan the barcode label.
Specifying the Time Zone The time zone setting is used to compare the instrument time to Greenwich Mean Time (GMT). This allows the instrument to communicate with other devices in accordance with CLSI Standard POCT-1A. 1. On the Supervisor menu, press 5 to display the Time Zone screen: 2. Enter the difference (in hours and minutes) between the local time zone and GMT. For example, if the local time is 2:00 pm and GMT is 7:00 pm, enter –5.00.
Specifying the Communication Protocol The instrument can communicate with a personal computer (using the COM port) or a network (using the Ethernet port). One of two communication protocols can be selected: • An ITC proprietary communication protocol that allows records to be transferred from the instrument and allows the instrument to be configured using ITC software such as HEMOCHRON Configuration Manager. This protocol is supported over COM or NET.
Specifying Continuous POCT-1A Communication Note: Communication is initiated from the instrument only when the CLSI POCT-1A compliant communication protocol is used. If the ITC proprietary communication protocol is used, communication is initiated from a personal computer or network. 1. From the Supervisor menu, press 7 to display the Communications menu: 2. Press 3 to select the desired communication option when the CLSI POCT-1A compliant communication protocol is used.
4. Press 0 to display the next page (for entering IP Address and Gateway settings): 5. Press 1 to display the screen for entry of the IP Address: Enter the IP Address using the numeral keys: 6. Note: Press Enter to move to the next field without entering a numeral. Press Cancel to move to the previous field. After the IP Address has been entered, press and hold ENTER.
11. Press 0 to display the next page (for entering the Remote Port setting) of the XPORT Setup module: 12. Press 5 to display the screen for entry of the Remote Port. Enter the Remote Port in the same manner as for the IP Address, then press and hold ENTER to again display the screen for entering the Remote Port setting. 13. Press ENTER while any page of the XPORT Setup module is displayed to save the new parameters.
Connecting a Computer or Printer An IBM-compatible laboratory computer or a serial printer (Seiko DPU-414 is recommended) can be used with the system. The connector port for these devices is located at the side of the instrument. Connector Port for AC/DC Power Module Connector Port for Computer or Printer Ethernet Port To Connect to a Printer: 1. Obtain a printer interface cable. Note: The printer interface cable is included with the optional HEMOCHRON Jr. PKIT (Printer Kit) only.
The cable configurations used for connecting a serial printer or a computer are shown below: Connecting the instrument to the Seiko DPU-414 printer with a DB9S connector Connecting the instrument to any personal computer with a DB9P connector STARTING THE INSTRUMENT Start the instrument by pressing and holding down the START key or by inserting a cuvette: Note: Allow cuvettes to reach room temperature (15 to 30 °C) before opening the pouch. This may take up to 60 minutes.
Starting the Instrument by Inserting a Cuvette 1. When a test cuvette (e.g., ACT+) is inserted to turn on the instrument, the following prompts are briefly displayed: (example only) followed by 2. Note: The test name for the inserted cuvette is displayed in the upper left-hand corner of the screen. Check the display for fault messages while the cuvette is warming. Refer to the Troubleshooting section for the procedure to resolve a fault message. The instrument then warms the cuvette to 37 °C ±1.0 °C: 3.
Entering an Optional Patient ID (PID) and/or an Operator ID (OID) A Patient ID (PID) and/or an Operator ID (OID) can be entered for each test. The IDs will be stored with the test results. Entry of a PID and/or OID is optional unless a mandatory entry is specified (see the Configuration Manager section on page 56).
To Enter an Operator ID: 1. Select ID to display the ID SELECTS menu: Note: A cuvette must be inserted into the instrument to display the ID SELECTS menu. 2. Press 2 to display the screen for entering the OID: 3. Scan the OID from a barcode label using the internal barcode scanner, or enter it using the keypad. a. To scan the OID from a barcode label, position the scanner port approximately four inches from the barcode label (see page 5) and then press PRINT/SCAN.
Note: Information for up to five lots of cuvettes for each assay type can be scanned using the Supervisor menu (page 18) or entered using Configuration Manager (see page 64). A cuvette lot number that has been scanned or entered is not displayed on the list after the lot reaches its expiration date. If more than five cuvette lot numbers per assay are scanned or entered, the lot number(s) with the closest expiration date will be deleted. b.
Entering a Mandatory PID and/or OID or PIN Entry of a Patient ID (PID) and/or an Operator ID (OID) or Operator Personal Identification Number (PIN) can be required for completion of a test (see the Configuration Manager section on page 56). If entry of one or more of these IDs is required, appropriate prompts for entry of PID and/or OID or PIN are automatically displayed. To Enter a Mandatory Patient ID: 1.
To Enter a Mandatory Operator PIN: 1. The PIN prompt is automatically displayed when a cuvette is inserted: 2. 3. 4. Enter the PIN using the keypad. Press and hold ENTER. If an acceptable PIN is entered, operation of the instrument continues: followed by Note: An acceptable PIN is any string of up to nine numeric digits (other than 0) that matches a PIN in the Operator Table. If an unacceptable PIN is entered, ID is Not Valid is displayed followed by the PIN prompt.
Entering a Mandatory Lot Number, Expiration Date, and Expected Range for Controls Entry of the lot number, expiration date, and expected range of liquid controls can be required for completion of a QC test. Note: Prompts for entry of the lot number, expiration date, and expected range of liquid controls are only displayed if the appropriate QC lot option is enabled through Configuration Manager (see page 57).
Enter the QC information using the numeral keys: Note: The QC information field consists of numerical characters (1406122890515200 in the example). The expiration date and expected range of the control is encoded in the QC information. After the QC information has been entered, press and hold ENTER to continue with the test. Adding a Note Up to two operator-selectable notes can be added to the record for each test and will be printed with the final record.
Starting the Test After initialization is completed the instrument beeps once, signaling the instrument is ready for the sample. Add Sample and Press Start are displayed with a countdown to START TIMED OUT (see the note below), and the blood sample can be placed into the cuvette and the test started. Note: START TIMED OUT is displayed if the test is not started within five minutes. If this occurs, repeat the test using a new cuvette. 1.
QUALITY CONTROL (QC) The Joint Commission on Accreditation of Healthcare Organizations (JCAHO) and other regulatory agencies recommend that medical and laboratory instrumentation be enrolled in a quality assurance program adequate in maintaining accurate and reliable performance of the equipment. Complete records of such quality control must be kept. Routine quality control testing should be part of a comprehensive quality assurance program.
QC Using EQC: 1. Display the QC Status menu: Note: Display the QC Status menu by pressing the QC key before a cuvette is inserted. If EQC is run while a cuvette is inserted, the message Detector Blocked is displayed and the EQC test fails. 2. Press 1. The test chamber warms to temperature and the EQC test begins. The results are displayed while the test is progressing. 3. When the test is completed, the results are displayed on the screen and written to the QC database. Press CANCEL to exit the screen.
To Check QC Intervals: Note: If a cuvette is not inserted in the instrument, pressing QC will immediately display QC Status and will allow the operator to run EQC. 1. With a cuvette inserted, press QC to display the QC SELECTS menu: 2. Press 4. The remaining time (shown as hours:minutes) before QC must be run on each test is displayed. Tests are listed in the order which QC will need to be run, with EQC always displayed last: 3.
LIMITATIONS Test results of the HEMOCHRON Signature Elite Microcoagulation instrument are affected by poor technique during blood collection and delivery to the sample well. The accuracy of the test is largely dependent upon the quality of the blood specimen, which is dependent upon the blood sample collection and the transfer of blood to the test cuvette. Refer to the individual assay package insert for specific limitations.
b. To print results obtained by a specific operator, press 2 to display the Print by OID screen. Scan or type the OID, then press ENTER. All patient test results obtained by the specified operator are printed. c. To print results obtained on a specific date, press 3 to display the Print by Date screen: Enter the date using the keypad, then press ENTER. All patient test results obtained on the specified date are printed. d.
b. To print results obtained on a specific date, press 2 to display the Print by Date screen: Enter the date using the keypad, then press ENTER. All QC results obtained on the specified date are printed. c. To print all results for a specific assay, press 3 to display the Print by Assay screen: Note: If the desired assay is not shown, press 7 to display additional assays. Enter the number for the assay, then press ENTER. All QC test results for the specified assay are printed. d.
Accessing Print Menu-2 Print Menu-2 allows printing of system information, entering a header, and checking of the printer and barcode scanner. 1. Press PRINT/SCAN to display the first page of the Print menu: 2. Press 7 to display the second page of the Print menu: To Enter a Custom Header: This feature allows creation of a custom header to appear on the top of each printout. The default header is - - -ITC - - -. A custom header can contain up to 20 characters. 1. 2. 3. 4.
Other Database Operations Results can be reviewed for both patient and QC tests. The total number of test results that are currently stored can be displayed, the total number of additional test results that can be stored can be displayed, and the results in either the patient database or the quality control database can be erased to make room for additional test results. Finally, POCT-1A communication can be initiated.
To Review Results of the QC Database: 1. Press 5. The first page of the results for the most current test record is displayed. 2. Press 9 to display additional pages of the record: 3. To scroll through additional test records, press ENTER (for the next record) or 0 (for the previous record). To Initiate Communication When Using the POCT-1A Communication Protocol: 1. Press 6.
Acronyms for Error Messages The following table lists the acronyms for Error Messages when viewing stored Patient or QC records: Acronym Description Display Message ORH ORL SNS STS STL Out of Range High Out of Range Low Sample Not Seen Sample Too Small Sample Too Large Out of Range-Hi Out of Range-Lo Sample Not Seen Sample Too Small Sample Too Large TTO Temp Timeout Heater Too Cool TTH Temp Too High Heater Too Hot SPF Sample Position Fault Sample Pos Fault UAT User Aborted Test User Abort
COMMUNICATION WITH A PC OR NETWORK The instrument can communicate directly with a personal computer (using the COM port) or a network (using the Ethernet port). One of two communication protocols can be selected: • An ITC proprietary communication protocol that allows records to be transferred from the instrument and allows the instrument to be configured using ITC software such as HEMOCHRON Configuration Manager. • A communication protocol that meets CLSI POCT-1A standards.
Communicating When the ITC Proprietary Communication Protocol is Used When the ITC proprietary communication protocol is used, communication must be initiated from the personal computer or network. 1. If necessary, check the instrument Communications menu and verify that the ITC proprietary communication protocol and the desired communication port (NET or COM) are specified: 2. or Note: The Communications menu is accessed from the Supervisor menu (page 21).
CONFIGURATION MANAGER HEMOCHRON Configuration Manager (HCM) software V3.0 or higher allows the supervisor to configure HEMOCHRON Signature Elite instruments so they meet the needs of the laboratory. The configuration is performed on a personal computer with installed HEMOCHRON Configuration Manager software. The computer is connected to the instrument by means of a COM port or a network connection.
Starting Configuration Manager 1. Select the ITC CM program icon. The Startup window is displayed: 2. When HEMOCHRON Configuration Manager software is run for the first time, instructions are displayed to logon using the default user name and password: a. Click OK and then click Start Program. The Logon dialog box is displayed with the default user name (supervisor) and password (supervisor): b. Click OK.
c. Enter the institution name, address, and/or contact information. Click Auto-Detect to automatically detect the PC COM port that is being used when connected to Signature Elite. Alternately, click the drop-down arrow in the COM Port box and select the number of the COM port used. Note: To modify these settings at a later date, select System Configuration from the Utilities menu. d. Click OK. The information is saved, and the User Master File Maintenance dialog box is displayed: e.
Menus Menus for HEMOCHRON Configuration Manager functions are displayed at the top of the main window: The use of each menu is described below: Menu Purpose Configuration Display the Read Configuration Data dialog box. This dialog box allows the operator to set the various configuration options (see page 54). Reports Display and print listings of configuration parameters, instruments, operators (see page 68), and audit trail.
Reading or Loading Configuration Data Select Configuration in the Configuration Manager main menu to display the Read Configuration Data dialog box. This dialog box allows configuration data to be read from a connected instrument or a different configuration file to be loaded: Note: HEMOCHRON Configuration Manager uses a Microsoft Windows user interface. Software features are intuitive and easy to learn.
3. Click Start. Configuration data are read from the connected instrument: Note: The instrument serial number and the name and revision level of the instrument configuration file are displayed in the Read Configuration dialog box. Progress of reading of configuration data is displayed in the status lines. Note: If the ITC proprietary communication protocol is used, Transferring Data is displayed on the connected HEMOCHRON Signature Elite instrument during data transfer.
Setting Configuration Options Reading a configuration file from an instrument or loading a configuration file from the database will open the Configuration Module dialog box (page 53). Buttons on the dialog box allow the supervisor to display and/or modify the instrument configuration: Button Purpose Instrument Options a. General Options 1. Specify when the display panel is illuminated. 2. Allow operators to change the date or time. 3. Allow operators to erase a database. 4.
Button Purpose Operator Table 1. Specify an OID, PIN, and/or certification expiration date for an operator. User Notes 1. Specify user-selectable notes that can be entered at the time of a test. Cuvette Lots 1. Specify up to five cuvette lot numbers and expiration dates that are to be used for each assay. QC Lots 1. Specify up five lot numbers, expiration dates, and expected ranges for level 1 (normal) and level 2 (abnormal) controls for each assay.
Operator ID Options 1. Not Required: Select if entry of an Operator ID (OID) or PIN is not required when running a test. 2. OID Required: Select to require entry of an OID (any OID) when running a test. 3. Valid OID Required: Select to require entry of an OID that is included in the Operator Table and is within the expiration period (if an expiration date is enabled for that user). 4. Valid PIN Required: Select to require entry of an authorized Operator PIN.
3. Pre-stored only: Enter a check mark to specify the cuvette information can only be selected from a list of lot numbers specified by the supervisor. Note: Up to five cuvette lot numbers and expiration dates can be specified for each assay (see page 64). Note: If more than five cuvette lot numbers per assay are scanned or entered, the lot number(s) with the closest expiration date will be deleted. QC Lot Options 1.
Specifying QC Lockout Parameters QC lockout parameters specify the maximum length of time that can elapse before liquid quality control (LQC) or electronic quality control (EQC) must be successfully run (QC Interval). When the lockout interval has elapsed and the test cuvette is inserted into the instrument, the user will be prompted to perform the appropriate QC. If 911 Limits are enabled, the user will be offered the choice to run a patient test.
7. 8. 9. 10. 11. Note: If Required, Scan only, and/or Pre-stored only is specified for QC Lot Options, the Low and High fields are not displayed. (If the QC testing displayed on the tab is required) Enter the maximum length of time (the QC Interval, from 0 to 1080 hours) that can elapse before the QC testing must be successfully run. Note: The interval time resets upon successful completion of QC.
Note: Subsequent dates and times will be determined automatically from the QC interval. Auto EQC: Enter a check mark to specify that EQC should be automatically run at the specified interval. Note: It Auto EQC is selected and the HEMOCHRON Signature Elite is connected to a power adapter, the instrument will remain on and perform the required EQC test at the appropriate interval. The results will be automatically stored in the database.
Saving the Options 1. Click Save to save the QC Exceptions parameters. Note: Cancel clears all fields without saving any parameters. Save & Exit saves the EQC/LQC lockout parameters and closes the dialog box. To Unlock an Instrument that has Reached QC Failure Limit or the 911 Limit Note: The HEMOCHRON Signature Elite must be connected to the Configuration Manager and the instrument configuration information read by clicking on Read Configuration from Instrument. 1.
Specifying Operator IDs and/or Personal Identification Numbers The Operator Table allows the supervisor to enter a name for each operator and then specify an Operator ID (OID), Personal Identification Number (PIN), and/or certification expiration date for each operator (or a group of operators). The supervisor can then specify in the Instrument Options dialog box (see page 55) whether entry of an OID or PIN that is included on the Operator Table is required before the instrument can be operated. 1.
To view OIDs without a PIN or expiration date, select the drop-down arrow in the Sort By box and select PIN or Expiration Date to sort the OIDs in order of their PIN or expiration date. This places OIDs without a PIN or expiration date at the beginning of the table. Important: Sorting OIDs by expiration date places those OIDs with the expiration field unchecked and grayed at the beginning of the list. However, the dates that are displayed in the grayed fields are not refreshed and are incorrect.
Entering Cuvette Lot Numbers and Expiration Dates Up to five cuvette lot numbers and expiration dates can be entered for each assay type. Selection or scanning of a cuvette lot number is only allowed when Required, Scan only, and/or Pre-stored only is specified for Cuvette Lot Options (see page 56). Note: Cuvette lot numbers may be scanned using the barcode scanner through the Supervisor menu and uploaded to Configuration Manager (page 19).
Entering QC Lots Up to five quality control lot numbers, expiration dates, and expected ranges can be entered per assay type for both level 1 (normal) and level 2 (abnormal) liquid controls. Selection or scanning of a QC lot number is only allowed when Required, Scan only, and/or Pre-stored only is specified for QC Lot Options (see page 57).
Enter the QC lot number, expiration date, and low and high limits for level 1 (normal) and/or level 2 (abnormal) controls. The limits that are entered may be from the expected range contained in the labeling for the controls or from an expected range specified by the supervisor. 4. Click Save to save the QC lot number information for the specified assay. Note: Cancel clears and closes the QC Lot Number Entry dialog box without saving entries. Exit closes the QC Lot Number Entry dialog box.
Writing Configuration Data to an Instrument After configuration data have been modified and saved, the data from the configuration file (or any other saved configuration file) can be downloaded to a HEMOCHRON Signature Elite instrument. To Write Configuration Data to an Instrument: 1. (If needed) Connect the instrument to the PC (see page 25). 2. (If needed) Start HEMOCHRON Configuration Manager and select the configuration file that is to be downloaded (see page 52). 3.
A message box is displayed when writing of the configuration data is complete. Click OK to acknowledge the message. Printing Instrument Configuration Data All of the configuration parameters for an individual instrument or a configuration file can be printed. 1. (If needed) Connect the instrument to the PC (see page 48). 2. (If needed) Start HEMOCHRON Configuration Manager and select the configuration file that is to be downloaded (see page 52) or click on Read Configuration From Instrument. 3.
MASTER FILE MAINTENANCE The Master File Maintenance function of HEMOCHRON Configuration Manager allows a record for a HEMOCHRON Signature Elite instrument or IP address to be added, modified, or deleted. Manually Adding an Instrument The supervisor can add a new instrument to the table of instrument serial numbers and unit locations. 1. Select Serial Number Master File from the Master File Maintenance menu.
Updating an Instrument Record The supervisor can modify or delete a record for an existing instrument. 1. 2. 3. 4. Select Serial Number from the Master File Maintenance menu. The Serial Number Master File Maintenance dialog box is displayed listing information for the first instrument record in the database. Note: The record number and total number of records in the database are displayed at the bottom of the dialog box.
Adding a User The supervisor can add a new user to the table of operators of HEMOCHRON Configuration Manager. The new user will be assigned a password and access level. Note: Any user can perform all operations until at least one user with an access level of Supervisor is defined. Once a supervisor is defined, only the supervisor can create and edit any files in Configuration Manager. All other users will only be allowed to view and print. 1. Select Security from the Utilities menu.
Setting the Instrument Date and Time The time clock of the HEMOCHRON Signature Elite instrument must be synchronized with that of the HEMOCHRON Configuration Manager PC so that correct starting times are used for system lockouts. Note: The time and date format that are used on an instrument may not be the same as that used in HEMOCHRON Configuration Manager. Setting the Instrument Date and Time when the ITC Communication Protocol is Used: 1. Start HEMOCHRON Configuration Manager (see page 49). 2.
Setting the Instrument Date and Time when the POCT-1A Communication Protocol is Used: 1. Start HEMOCHRON Configuration Manager (see page 49). 2. Read the configuration from the instrument that is connected over the network (see page 52). Note: When the POCT-1A communication protocol is used, HEMOCHRON Configuration Manager cannot communicate with the instrument over the COM port. 3.
Select the operation (Compress Database, or Repair and Compress Database) that is to be performed. 3. Click OK. The databases are repaired and/or compressed. Converting the Database 1. Select Convert HCM Data from Ver 1.0 (or 2.0) from the Utilities menu. The Convert HCM Data from Version 1.0 (or 2.0) dialog box is displayed: 2. 2. Note: The source and destination paths are shown. These cannot be modified. Click OK to start the conversion.
TROUBLESHOOTING Configuration Manager Error Messages Problem Cause Corrective Action CHKSUM error during data transfer Other software applications are open during data transfer. Close all applications including anti-virus programs during communications. Communication error/ Initialization error Incorrect cable is used or cable is not completely connected. Ensure proper cable is being used. Check cable connections. No COM Port No COM Port available.
Error Message Cause Corrective Action Detector Fault Light path between LED and detectors is blocked. Repeat test with new cuvette. If message persists, contact ITC Technical Support. Detector Blocked EQC is being run while a cuvette is inserted. Remove the cuvette and repeat the EQC. Sample Pos Fault Sample has moved outside of testing area in cuvette. Contact ITC Technical Support. ASSAY LOCKED CALL SUPERVISOR The QC failure limit has been exceeded. Remove the cuvette.
Error Message Cause Corrective Action Lot Expired The cuvette and/or QC material that is being used has reached its expiration date. Remove the cuvette and repeat the test using supplies that are within their expiration date. Action Denied Date/Time cannot be changed if QC Lockout is required, or Date/Time function is denied through Configuration Manager. Supervisor needs to reconfigure instrument using HCM. Disallowed Assay Assay performance has been prohibited via Configuration Manager.
Verification of Barcode Scanner Check the barcode scanner by scanning a test barcode. To Test the Barcode Scanner: 1. Press PRINT/SCAN to display the Print menu: 2. Press 7 to display the second page of the Print menu: 3. Press 3 to test the scanner: 4. Position the scanner port (see page 5) approximately four inches from the barcode label that is shown below: 5. 6. 7. Note: The barcode shown above is formatted as Code 128. Press PRINT/SCAN.
SERVICE AND MAINTENANCE CAUTION: This manual provides safety instructions for instruments equipped with class 1 or class 2 barcode scanner lasers. Please refer to the back panel of the instrument to identify the class of laser and follow appropriate instructions provided in this manual. Routine Maintenance Inspect and clean the cuvette opening as required. Remove residual dried blood or other foreign matter using water-moistened cotton swabs. Remove any residual water with dry cotton swabs.
SAFETY STANDARDS The HEMOCHRON Signature Elite instrument complies with the following safety standard requirements and directives: CSA C22.2. 601.1.
(This page intentionally left blank.
INDEX acronyms used.....................................................4 action keys...........................................................5 adding a user.................................................... 70 attention label................................................... 11 battery care.............................................................. 78 charging ...................................................... 13 checking ...................................................... 14 life ..........
addition........................................................33 operating precautions.......................................37 operator ID (OID) entering........................................................28 entering a mandatory operator ID..............30 overview...............................................................2 patient ID (PID) entering........................................................27 entering a mandatory patient ID ................30 prewarm ................................
HX1101 0310 84