User Manual User Manual Product Name: 3G SMART PHONE Brand: NYX Model: SPARK Manufacture: Shenzhen qianhai aibo Science and Technology Ltd.
User Manual Contents CONTENTS ...................................................... 2 1.APPEARANCE AND KEYPAD OPERATIONS .............................. 3 2.USING MEMORY CARD AS U DISK ................................... 4 3.WLAN ......................................................... 4 4.BLUETOOTH ..................................................... 5 6.MESSAGING ..................................................... 8 7.CONTACTS ..................................................... 10 8.
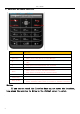
User Manual 1 .
User Manual 2. Using Memory Card as U Disk If you want to send music, pictures or other files to the phone’s memory card from the computer, you should set memory card as u disk first. Set memory card as u disk,Connect the phone to the computer with USB cable. Notice: different computer operating system to how to operate to normal use the U disk。 3.WLAN WiFi provides as far as 300feet (100M) range of wireless network access.
User Manual In the interface of wireless and network, touch Wi-Fi settings. The founded Wi-Fi networks will show on the Wi-Fi network list. Touch other Wi-Fi networks, and then you can connect to this network. Notices:in addition, you can surf the internet via GPRS. We default that the GPRS in SIM1 is opened after started, users can select manually ,the specific location is “settings>wireless and internet>data connection”,touch “SIM1、no data connection”,when the dot turns green, it’s already opened. 4.
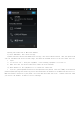
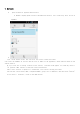
Pairing and connection of Bluetooth headset 1) Press home>menu, then touch settings. 2)Touch wireless and internet>Bluetooth settings, then select Bluetooth box, then your phone will scan for the Bluetooth devices within range ,and show the founded devices in the list under the icon. • Tips: a. If the list can’t find your equipment, touch scanning equipment to re-scan it. b. Make sure that the devices wanted are under the detected mode. 3) Touch headset in the equipment list to finish the connection.
5. Dialling When the icon of internet server appears in the screen, you could dial or receive callings. The signal bar on the top right corner show the strength of network signal (the maximum with 4 signal bars) . • Start dialing a. Open the application main interface > dial.
Dialling At the dialing Keboard ,enter the phone number,and then click the dialing key . If needed to call the extension,you could click the “dial pad” in the bottom of the screen to open the interface or press menu key to select “delay 2 seconds”,and then enter the number of the extension. Telephone calls in the call log Every telephone number called will reserved in phone’s menu of call log. All numbers in the call log can be dialed by clicking the button ”dial” on the right side of the screen.
Send MMS to certain phone number When creating message,it was defaulted as SMS,it will be turned to MMS when following operations were done. You can send MMS via clicking “send” after editing. 1) In the interface of “edit”,Click the button of “Menu”: Click “append”,you can spend the following attachments,then it will be turned to MMS automatically. Send messages to multiple numbers Enter multiple numbers in the box of entering,each number is divided by the comma in English.
7. Contacts Open the menu of applications>contacts Default display phone contacts and SIM card contacts, sort contacts by first letter of alphabet. 2)A. Click Search Icons,You can enter the contact search interface. a.To enter the Numbers or letters and the list of names of the agreement, which will be shown in the search results。 B.If it were not so search to match of the contact, interface will appear 'not find any contact.
a. Menu >Delete contacts Can “All”Icons checked, click the delete button, delete all the contact person, including cell phone and SIM card of contact. Can separate check one or more contacts, click the delete, delete the selected all contacts. b. Menu> To display of the contact You can choose all contact, one a SIM card of contact, the 3G SMART PHONE contacts c. Choose from the definition, but also on a SIM card and cell phone choice whether or not to show that all the lone contacts. d.
c. Menu >Send messaging by group. Automatic new information, and the group added to contact the address bar recipients d. Menu >Send Email by group If contact group have the same email address, the automatic new mail, and E-mail address in the address bar add to the receiver 8. Internet Explorer Internet explorer 1)In the interface of internet explorer,input address filed and enter the URL. 2)Use keypad to enter URL. The appropriate web sites will appear on the screen.
d. e. f. g. h. Page info,display page address and other information of the current browsing. Share page,select the Bluetooth or SMS to share the current page. Downloads,show all the content downloaded. History, Show your browsing history, and view the most visited pages of information. Setting,containts a variety of browser settings. 9. Recorder The recorder can record sound and fast by sending MMS or Bluetooth, also can be recorded voice as Ring tones.
Alarm clock 1) open the alarm clock, the 3G SMART PHONE will be in your set when the time arrives, a ringing or vibration to remind you that in order to achieve the alarm clock function. 2) by adding alarm clock icon can add the alarm clock. You can set the alarm clock according to your needs. In the "alarm clock" interface, there will be two in the closed alarm clock (two alarm clocks, respectively, from Monday to Friday at 8:30 on Saturday, Sunday, 9 points).
12. Camera 12.
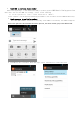
Prior preparation Install memory card before using the camera or video camera. All your photos or videos taken by the phone are stored in memory card. Open camera Press home, select camera. Take pictures Use the arrow keys or long press the menu key out the cursor Move to before and after the camera button to switch between the default camera and the self timer. Take photos 1)Screen aligned with your subject. 2) click the shutter button directly on the screen, and take the picture.
12.2 Video camera Prior preparation Install memory card before using the camera or video camera. All your photos or videos taken by the phone are stored in memory card. Take video Press the home page, click the menu, select the camera. Switch to camera mode. Shooting video 1) use the screen to align your subject. 2) touch the shutter button directly on the screen. 3) after the shooting, the video automatically takes the time as the file name, save to the gallery default camera photo folder.
A. use e-mail to send a picture: select the e-mail, the picture will be automatically attached to the e-mail. Write your message, click send. B. uses the information to send pictures: information, pictures are automatically added to the multimedia message. Write your message, click send. C. Using Bluetooth to send a picture: in the Bluetooth list, select the paired bluetooth device, through the Bluetooth to send pictures.
Tips: You can play all of the songs in the interface of music media, in random sequence . Press Menu, and then click the Party Shuffle. Then will start playing the first song randomly selected . To close the Party Shuffle, press Menu, then click to turn off the Party Shuffle. 17.
Listen to FM radio background Click to return to key, the radio program moved to the background, right now you can still continue to listen to the show, and can also carry out any other program. 18. Setting Your service provider may default some device settings, so you may not be able to change these settings. Wireless and internet WIFI Wi-Fi and Wi-Fi settings click Wi-Fi to open .
More Wireless & networks a. Airplane mode b. VPN c. Mobile networks Displays a. Brightness Adjust the brightness. b. Auto rotating screen Rotate phone to change direction. c. Animation Choose to display animations. d. Screen Timeout Adjust the delay before the screen automatically locks. Audion profiles This option gives the phone tones’ settings under the status of receiving calls or notification.
Device administration a. b. c. d. e. f. Device administrators View or deactivate device administrators. Unknown sources Allow installation of apps from unknown sources. Verify apps Disallow or warn before instakkation of apps that may cause harm. Auto-start management Allow or deny app auto-start during system bootup. App permissions Manage app permissions for security and privacy protection. Mobile anti-theft Lock the phone or wipe data remotely. Credential storage a. b. c. d. Language a. b. c. d. e.
2010/12/31 Fri,Dec 31,2010 Fri,31 Dec 2010 2010 Dec 31,Fri About phone You can check the information on status bar and remaining power. 17. Notices for the use of phone Your phone is a product of superior design and craftsmanship and should be treated with care. The following suggestions can help you comply with the terms of repair kits, to extend the life of 3G SMART PHONE. 1) Place the 3G SMART PHONE and their parts and components out of reach of small children.
FCC Warning This device complies with part 15 of the FCC Rules. Operation is subject to the following two conditions: (1) This device may not cause harmful interference, and (2) this device must accept any interference received, including interference that may cause undesired operation. Any Changes or modifications not expressly approved by the party responsible for compliance could void the user's authority to operate the equipment.