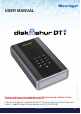
USER MANUAL iStorage diskAshur DT2® Manual – v 1.8 Please make sure you remember your PIN (password), without it there is no way to access the data on the drive. If you are having difficulty using your diskAshur DT2 drive please contact our technical department by email - support@istorage-uk.com or by phone on +44 (0) 20 8991 6260. www.istorage-uk.
Copyright © iStorage, Inc 2017. All rights reserved. Windows is a registered trademark of Microsoft Corporation. All other trademarks and copyrights referred to are the property of their respective owners. Distribution of modified versions of this document is prohibited without the explicit permission of the copyright holder. iStorage diskAshur DT2® Manual – v 1.
Table of Contents www.istorage-uk.com #3 iStorage diskAshur DT2® Manual – v 1.8 Introduction ....................................................................................................................................4 Box Contents ..................................................................................................................................4 1. diskAshur DT2 Layout ..............................................................................................................
LED LIGHTS - Standby State/Locked - User Mode/Unlocked - Admin Mode Alphanumeric Keypad LOCK SHIFT UNLOCK USB 3.1 PORT diskAshur DT2 rear view DESK LOCK SLOT AIR VENT Mains Power ON/OFF SWITCH Introduction The diskAshur DT2 is an easy to use, ultra-secure, hardware encrypted desktop hard drive with capacities of up to 8TB. Simply switch the power on and connect the USB 3.
1. diskAshur DT2 Layout The indicator light displays the following colours to indicate the various modes of operation: RED: Standby Mode BLUE: Admin Mode A GREEN: User Mode LED Indicator Lights A ABC DEF GHI JKL MNO PQRS TUV WXYZ LOCK SHIFT UNLOCK iStorage diskAshur DT2® Manual – v 1.
2. Connecting your diskAshur DT2 Be sure to read the following information before you begin to use the diskAshur DT2. Attention: Use only the cables provided with your diskAshur DT2. You may damage the drive if you use a cable not included with the diskAshur DT2. 1. Ensure that the power switch on the back of the diskAshur DT2 is in the OFF position. 2. Connect the diskAshur DT2 to a power outlet using the included AC Adapter. 3.
3. diskAshur DT2 LED States When the diskAshur DT2 is plugged in, there are three possible behaviours for the LED indicators as shown in the table below. RED GREEN BLUE Solid Solid Solid Off Solid Off Off Solid Off diskAshur DT2 State Factory Reset 1 Brute Force 2 Standby 3 1. In Factory Reset State, the drive is waiting for the operation to set up an Admin PIN. 2. In Brute Force state, the drive is waiting for an operation to get more PIN entry attempts. 3.
5. Unlocking the diskAshur DT2 The diskAshur DT2 can be unlocked with either an Admin or User PIN whilst in standby state (solid RED LED). 1. To unlock as the Administrator, enter the Admin PIN and press the “UNLOCK” button. 2. To unlock as a User, first press the “UNLOCK” button (all LEDs, PIN and press the “UNLOCK” button again. blink on and off) and then enter the User 3. If correct User PIN is entered, both GREEN and BLUE LEDs will blink alternately and then return to a solid GREEN LED. 4.
8. Changing the Admin PIN PIN requirements: • • • Must be between 7-15 digits in length Must not contain only repetitive numbers, e.g. (3-3-3-3-3-3-3) Must not contain only consecutive numbers, e.g. (1-2-3-4-5-6-7), (7-8-9-0-1-2-3-4), (7-6-5-4-3-2-1) Password Tip: You can create a memorable word, name, phrase or any other Alphanumerical PIN combination by simply pressing the key with the corresponding letters on it.
9. Adding a new User PIN in Admin Mode To add a New User, first enter the “Admin Mode” as described in section 7. Once the drive is in Admin Mode (solid BLUE LED) proceed with the following steps. Solid BLUE LED will change to blinking GREEN and solid BLUE LEDs 1.
12. Set Read-Only in Admin Mode Important: If data has just been copied to the diskAshur DT2, make sure to properly disconnect the drive first by clicking ‘Safely Remove Hardware/Eject’ the diskAshur DT2 from the Operating System before reconnecting and setting the diskAshur DT2 as ‘Read-Only/Write-Protect’. When Admin writes content to the diskAshur DT2 and restricts access to read-only, the User cannot change this setting in User mode.
15. How to Delete the Self-Destruct PIN To delete the Self-Destruct PIN, first enter the “Admin Mode” as described in section 7. Once the drive is in Admin Mode (solid BLUE LED) proceed with the following steps. 1. In Admin mode, press and hold down “SHIFT + 6” buttons Solid BLUE LED will change to a blinking RED LED 2. Press and hold down “SHIFT + 6” buttons again Blinking RED LED will become solid and then change to a solid BLUE LED indicating the Self-Destruct PIN was successfully deleted 16.
17. How to Create an Admin PIN after a Brute Force attack or Reset It will be necessary after a Brute Force attack or when the diskAshur DT2 has been reset to create an Admin PIN before the drive can be used. If the drive has been brute forced or reset, the drive will be in a standby state (solid RED LED). to create an Admin PIN proceed with the following steps. PIN requirements: • • • Must be between 7-15 digits in length Must not contain only repetitive numbers, e.g.
19. Turn off the Unattended Auto-Lock Clock To turn off the Unattended Auto Lock, first enter the “Admin Mode” as described in section 7. Once the drive is in Admin Mode (solid BLUE LED) proceed with the following steps. 1.
22. Set Read-Only in User Mode Important: If data has just been copied to the diskAshur DT2, make sure to properly disconnect the drive first by clicking ‘Safely Remove Hardware/Eject’ the diskAshur DT2 from the Operating System before reconnecting and setting the diskAshur DT2 as ‘Read-Only/Write-Protect’. To set the diskAshur DT2 to Read-Only, first enter the “User Mode” as described in section 20. Once the drive is in User Mode (solid GREEN LED) proceed with the following steps. 1.
24. Brute Force Protection If an incorrect PIN is entered 15 (3 x 5 PIN clusters) consecutive times, then all Admin/User PINs, the encryption key and all data will be deleted and lost forever. The diskAshur DT2 will then need to be formatted and partitioned before it can be reused. 1. If a PIN is entered incorrectly 5 (five) consecutive times, all LEDs - RED, GREEN, BLUE will light up and become solid. 2. Switch the ON/OFF power button OFF and then back ON again to get five more PIN attempts.
26. Initialising and formatting the diskAshur DT2 After a ‘Brute Force Attack’ or a complete reset of the diskAshur DT2 will delete all data, encryption key and partition settings. You will need to initialise and format the diskAshur DT2 before it can be used. To initialise your diskAshur DT2, do the following: 1. Attach the diskAshur DT2 to the computer. 2. Create a new Admin PIN - see page 13, section 17, ‘How to create an Admin PIN after a Brute Force attack or reset’. 3.
7. In the Initialise Disk window, click OK. 8. Right-click in the blank area under the Unallocated section, and then select New Simple Volume. The Welcome to the New Simple Volume Wizard window opens. 9. Click Next. iStorage diskAshur DT2® Manual – v 1.8 10. If you need only one partition, accept the default partition size and click Next. 11. Assign a drive letter or path and click Next. 12. Create a volume label, select Perform a quick format, and then click Next. 13. Click Finish. 14.
27. diskAshur DT2 Setup for Mac OS Your diskAshur DT2 is preformatted in NTFS for Windows. To reformat the drive to a Mac compatible format please read below. Once the drive is unlocked, open Disk Utility from Applications/Utilities/Disk Utilities. To format the diskAshur DT2: 1. Select diskAshur DT2 from the list of drives and volumes. Each drive in the list will display its capacity, manufacturer, and product name, such as ‘iStorage diskAshur DT2 Media’ or 232.9 diskAshur DT2. 2.
4. Select a scheme and volume format to use. The Volume Format dropdown menu (figure 3) lists the available drive formats that the Mac supports. The recommended format type is ‘Mac OS Extended (Journaled).’ The scheme format dropdown menu lists the available schemes to use (figure 4). We recommend using ‘GUID Partition Map’ on drives larger than 2TB. figure 3 figure 4 iStorage diskAshur DT2® Manual – v 1.8 5. Click the ‘Erase’ button.
28. diskAshur DT2 Setup for Linux (Ubuntu 14.04) If your diskAshur DT2 has been initialised and formatted in NTFS for Windows, you can directly use the drive on Ubuntu. If not, please read below. To format the diskAshur DT2 as FAT filesystem: 1. Open ‘Unity Dash’ and type ‘Disks’ in the search box. Click on the ‘Disks’ utility when displayed. 2. Click to select the drive (6.0 TB Hard Disk) under ‘Devices’. Next click on the gears icon under ‘Volumes’ and then click on ‘Format’. 3.
4. Click ‘Format’ again. 5. The drive will start to be formatted. to mount the drive to Ubuntu. iStorage diskAshur DT2® Manual – v 1.8 6. After the format process is finished, click #22 www.istorage-uk.
7. Now the drive should be mounted to Ubuntu and ready to use. 8. A disk icon will be shown as seen in the image below. You can click the disk icon to open your drive. www.istorage-uk.com iStorage diskAshur DT2® Manual – v 1.8 Lock diskAshur DT2 for Linux (Ubuntu 14.04) It is strongly recommended to right click your drive icon and then click ‘Safely remove’ in the OS to eject (lock) your diskAshur DT2, especially after data has been copied or deleted from the drive.
29. Hibernating, Suspending, or Logging off from the Operating System Be sure to save and close all the files on your diskAshur DT2 before hibernating, suspending, or logging off from the operating system. It is recommended that you lock the diskAshur DT2 manually before hibernating, suspending, or logging off from your system. To lock, simply press the ‘LOCK’ button on the diskAshur DT2 or by clicking the ‘Safely Remove Hardware/Eject’ icon within your operating system.
31. How to check Firmware in User Mode To check the firmware revision number, first enter the “User Mode” as described in section 20. Once the drive is in User Mode (solid GREEN LED) proceed with the following steps. Solid GREEN LED will change to blinking GREEN and BLUE LEDs 1. In User mode press and hold down “3 + 8” until GREEN and BLUE LEDs blink together 2. Press the “UNLOCK” button and the following happens; a. b. c. d. e. All LED’s (RED, GREEN & BLUE) become solid for 1 second.
32. Technical Support iStorage provides the following helpful resources for you: iStorage’s Website https://www.istorage-uk.com E-mail correspondence support@istorage-uk.com Telephone support with our Technical Support Department on +44 (0) 20 8991-6260. iStorage’s Technical Support Specialists are available from 9:00 a.m. to 5:30 p.m. GMT - Monday through Friday. 33. Warranty and RMA information Two Year Warranty: iStorage diskAshur DT2® Manual – v 1.
iStorage diskAshur DT2® Manual – v 1.8 © iStorage, 2017. All rights reserved. iStorage Limited, iStorage House, 13 Alperton Lane Perivale, Middlesex. UB6 8DH, England Tel: +44 (0) 20 8991 6260 | Fax: +44 (0) 20 8991 6277 e-mail: info@istorage-uk.com | web: www.istorage-uk.com www.istorage-uk.