. www. Springfield com www, 123ler.com SNEERING REVERSE OSMOSIS SYSTEMS USER’S MANUAL Model #RCPT a Specifications » Production: 300GPD s Safetvapproval: CE, UCS 18000, and R Ohs Feed Water pressure: 25 psi # Fed Water Temperature: 40 «100°F + Feed Water pH 2.
Tools & Materials That May Be Required For Standard installation: 1. Wineglasses: 2. Variable Speed Drill with 3/8" Chuck. 3.940 Bit 4.1 1/4" Hole Saw (if additional hole ls needed in sink for faucet). 5. Extension Cord, Drop Light or Flashlight. 6. Teflon Tape 7. Plastic Anchors & Screws. 8. Razor Blade, Screw Driver, Pliers, Adjustable Wrench (2). 9, Pencil & Old Towels, 10. Basin Wrench, Center Punch & Hammer, 11. Porcelain All Kit (Porcelain sink requiring additional hole).
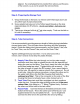
Step 1 -System Positioning and Preparation 1. The Reverse Osmosis (RO) System is designed to fit under most sinks. iris also commonly installed in the utility-area of lower levels or basements: and the tubing blended up tithe faucet landlord ice maker. cantabile installed anywhere that will not presents problem of freezing in the winter. Basement installations offer watercolor during the summer months.
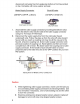
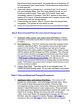
disconnect cold water ing frangible stop Bottom or from facet stud on top. Complete with pone-washer and seal. Water Supply Connector Shuffleboard (SEMIPRO x L:36mm) (HARELIP x 14'00 147) i Be . ERIE On Segundo Ee 1. Sensibleness the water supply Confiding by inserting the Deliver valve, Boru the deliver-valve into the side of the water supply connector using 80 10 wraps of Sellotape, 2. Disconnect the water supply ling from the cold-water faience underneath sink.
3. Donor use a tube insert on the Incoming water ling connection: This will restrict the flow and/or pressure tithe system and cause tio run continuously; possible fouling the membrane. Step 3s install "Drain Saddle” Locale train hole as toes ws possible Top of poe Livers shakes ole on a tr sight Teddy of declarative pest in {haven 45° pod lop] mid us ar 88 impeachable ue SEE a aha Win add snl partridge disposal. 1. Sink With Electroshock location to plate drain saddle.
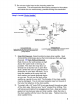
Eo Step d-Install RO. Faucet (Standard Non-Air-Gap faucet) 1. Most sinks have an extra hole for the mounting of additional facets sprayers or sop dispensers; If your sink dog not already have an additional hole, use the following procedure. Determine Ligation of Faucet Hole, Underneaths sink before drilling, making sure there are no obstructions. if using.
aligned. Fa small adjustment is needed from above, pad the jaws of the wrench. seas pot iosomichithexchrome finish. Step 5 Preparing the Storage Tank 1. Wha the threads on the tank 3 of times with Teflon tape (don't tse any other type of pip compounds). 2. Screw plastic ball valve onto the Teflon taped threads on the tank (approximately 4 oS full tums «donor over tighten ball valve ¢an crack, 3.
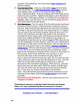
4. Drain Tube Corsair Gap Faucet ‘Connect the bite tithe RO system drain fitting, This is the fitting anthologize behind the Remembrances housing, Tighten tiv so iba will not pal outer fitting. There i8 8 snowball cylindrical flow restrict or in this line that will help identify it. Cut tube to length and connect the thereunder to the drain saddle that you installed earlier. Tighten Brambly, Input Water A. RED: Confectioner tubing from the water supply connector to Sediment feller canister, BE.
faucet and at first may be black, Let water drip out of faucet for 30 full minutes:and then close faucet. This flushes the carbon: filters on first lime Use: 4; Ops ball valve onstage tank. Letitia fill for 2 to 3 Hours (f vou are changing filters, your tank may already be full, so you would not need to wait). Then-open R.O, fateful. Drain tank completely (about 15 minutes). Shut RO. chalice off and drain again in 3 to4 hoes.
properly when tightening We commitment Dow Corning 111 silicone sealant. 2. Post Carbon Filter Unscrew white plastic Ace nut from both ends of post filter, or, if John Guest Quick connectors, remove clear plastic tubes. Unscrew and remove plastic fittings, if Jato, Discard old filler, ‘Wrap Jacob fittings with Teflon tape aid re~ install into new post filter. Tighten white plastic nuts fo the ends.of the new filler.
Limited Warranty For a period of one year from the date of original purchase, we will replace or repair any part of the reverse osmosis Walter system that we find to be defective in operation due to faulty materials or workmanship except forth replaceable Liters and membranes.
Service Record Date of Purchase Date of [fist all; Installed by: 2nd Stage 3rd Stage Sth Stage 4st Stage # te Ath Stage a9 GAC CTO {nine Date Sediment membrane Carbon Carbon Carbon {6 months) (1-3 years) {6 months) | (6 months) {1.