ROCKER NOTE: THIS INSTRUCTION BOOKLET CONTAINS IMPORTANT SAFETY INFORMATION. PLEASE READ AND KEEP FOR FUTURE REFERENCE. Lot number: (TAKEN FROM CARTON) ___________________ Date of purchase: _______ / _______ / _______ DO NOT RETURN PRODUCT TO THE STORE. If a part is missing or damaged, contact our customer service department. We will replace the part FREE of charge. LP! FOR ASSISTAN -1980 RETURN PROD DAS@DOREL.
CUSTOMER SERVICE NOTES * Ensure all parts and components are present before beginning assembly. * Assemble on a clean, smooth surface to prevent damage to product finish. * DO NOT use power tools. * CAUTION: Adult assembly required. * Assembly and handling will require two people. * Estimated assembly time: 8 minutes. CARE AND CLEANING Dust regularly with a soft, dry cloth to prevent soil build up. Wipe away spills immediately to prevent staining.
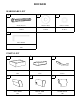
ROCKER HARDWARE LIST 1 2 3 Ø5/16" X 2-1/2" Ø22 X 1.8mm Ø12.5 X 1.
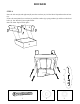
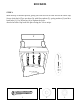
ROCKER STEP 1: Place the left arm (D) and right arm (E) onto the seat base (A). Lift the fabric flap underneath seat base (A). Secure the arms (D & E) to seat base (A) with flat washers (2), spring washers (3) and hex socket head bolts (1). Use Allen Key (4) to tighten bolts. Place the fabric flap back into place.
ROCKER STEP 2: Attach the chair back (F) to the assembled unit by inserting the metal brackets on chair back (F) into the metal glides on left arm (D) and right arm (E). Push the chair back (F) with a downward force to secure it into place.
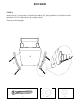
ROCKER STEP 3: With the help of another person, gently place the unit on its back and lift the fabric flap. Secure chair back (F) to seat base (A) with flat washers (2), spring washers (3) and hex head bolts (1). Use Allen key (4) to tighten the bolts. Attach the fabric flap back into place using the Velcro strips.
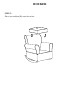
ROCKER STEP 4: Attach feet (C) to seat base (A) with flat washers (2), spring washers (3) and hex socket head bolts (1). Use Allen Key (4) to tighten bolts. Turn the rocker upright.
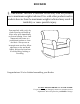
ROCKER STEP 5: Place seat cushion (B) onto the rocker.
ROCKER CAUTION: This unit is intended for use only with the products and/or maximum weights indicated. Use with other products and/or products heavier than the maximum weights indicated may result in instability or cause possible injury. Dust regularly with a soft, dry cloth to prevent soil build up. Wipe away spills immediately to prevent staining. Use a cloth dampened with water or a professional product to clean the fabric. Always test an inconspicuous area first.
Customer Service PLEASE DO NOT RETURN THIS PRODUCT TO THE STORE PLEASE CONTACT CUSTOMER SERVICE REPRESENTATIVES AT THE FOLLOWING NUMBERS SHOULD THERE BE ANY MISSING OR DEFECTIVE PART(S).