
Product Manual

Page 6 of 12
another tool. Never use an accessory that has a lower operating speed or operating pressure than
the tool itself.
Keep guards in place and in working order. Never operate the product without the guards in place.
Do not leave the tool running unattended.
Specific Operation Warnings
⚠WARNING
To avoid injury, slide bar lock must be fully engaged if winch assembly is extended.
Wear ANSI Z87.1 compliant safety goggles, hard hat, heavy duty gloves, and steel toed boots
during setup and use.
Do not exceed the rated load capacity.
Do not use to transport people or pets.
Secure load before raising or lowering load.
Only use the hoist to raise and lower one panel at a time.
Never load a drywall panel or operate the hoist if the lock pins are not engaged at one of the three
positions.
Use ONLY for lifting a drywall panel.
NEVER lift more than 150 lb.
To avoid serious injury, watch for overhead obstructions when raising panel.
Cradle drops rapidly when brake arm is released.
Control the winch with your right hand on wheel handle BEFORE releasing brake.
Be sure the winch components are clean and dry before operation.
Inspect the tool for wear or damage. Pay special attention to any wear or damage to the wire rope.
Carefully inspect the hoist before operating.
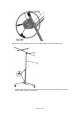
Assembly Instructions
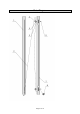
To install this accessory, remove the standard telescoping sections:
Release the cable tension until you can loosen the cable from the mooring tab in the winch. Pull
the cable out through the hole in the winch drum.
With large pliers, grasp the top end of the two telescoping sections and lift them out of the frame
housing as a unit. Pulling the free end of the cable toward the winch wheel will help raise the
telescoping sections.
Remove the telescoping sections (and the cable) completely out of the frame housing.
Install the Longer telescoping sections.
Loosen the buckle and take out the steel cable.