
Product Manual


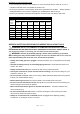


Page of 12
7
ASSEMBLY AND ADJUSTMENTS
WARNING
:
Always be sure that the tool is switched off and unplugged before adjusting,
installing accessories, or checking a function of the tool.
With the Accessory Quick-Change System on the tool and Universal Quick-Fit accessories included,
changing the accessories does not require an additional tool.
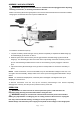
To Install the Accessories (FIG 2)
1. Flip the Accessory Quick-Change Lever (3) forward completely to separate the blade flange (a)
and shaft flange (b) as shown on FIG 2.
2. Slide the open-end of the accessory into the gap between the blade flange (a) and the shaft
flange (b). The shaft flange of this tool comes with a 6-pin design. Place the accessory over the
pins on the shaft flange. Make sure the holes on the accessory properly engage 5 of those 6
pins.
3. Flip the Accessory Quick-Change Lever (3) back to locked position to secure the accessory in
place.
NOTE: Some accessories, such as a saw blade, may be mounted either straight on the tool, or at
an angle to enhance usability. Always make sure 5 of the 6 pins are engaged as described in step 2
above.
NOTE: For maximum sandpaper life, rotate the pad or sandpaper 120 degrees when tip of
sandpaper becomes worn.
To Remove Accessories From the Tool, flip the Accessory Quick-Change Lever forward completely,
disengage the accessory from the pins and pull the accessory off the tool.
OPERATION
WARNING
:
To reduce the risk of serious personal injuries, read and follow all
important safety warning and instructions before using this tool.
WARNING
:
Always be sure the tool is disconnected from the power source before
making any adjustments or setting up prior to cutting. Failure to disconnect or unplug the
tool may cause accidental starting, resulting in serious personal injury.
NOTE: Always check that the power supply corresponds to the voltage on the ratings plate.