500 AMP BATTERY/ CARBON PILE TESTER WARNING: Read carefully and understand all ASSEMBLY AND OPERATION INSTRUCTIONS before operating. Failure to follow the safety rules and other basic safety precautions may result in serious personal injury.
Thank you very much for choosing an Ironton product! For future reference, please complete the owner’s record below: Model: _______________ Purchase Date: _______________ Save the receipt, warranty and these instructions. It is important that you read the entire manual to become familiar with this product before you begin using it. This battery tester is designed for certain applications only. The distributor cannot be responsible for issues arising from modification.
parts. Protective, electrically non-conductive clothes and non-skid footwear are recommended when working. Wear restrictive hair covering to contain long hair. 7. Use eye and ear protection. Always wear ANSI approved impact safety goggles. Wear an ANSI approved dust mask or respirator when working around metal, wood, and chemical dusts and mists. 8. Do not overreach. Keep proper footing and balance at all times. Do not reach over or across running machines. 9. Maintain tools with care.
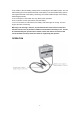
. Be certain of the test battery polarity before connecting the test Cable Clamps. The red Cable Clamp goes to the positive terminal of the battery. The black Cable Clamp goes to the negative terminal of the battery. Reversing Load Tester Cable Clamps on the battery will damage the tester. 5. Do not drop the Load Tester as it may affect proper operation. 6. Do not smoke or have open flames near the battery. 7. Do not connect the Load Tester to the battery while the engine is running.
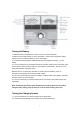
Testing the Battery 1. Wipe the battery terminals with a cloth to remove any dirt and grease. 2. Make sure the Load Knob (C) is in the off position. Connect the red (positive) Cable Clamp (A) to the positive terminal (+) on the 12V battery. 3. Connect the black (negative) Cable Clamp (B) to the negative terminal (–) on the battery. 4. Turn the Load Knob (C) clockwise until the DC ammeter reads 1/2 the Cold Crank Amp (CCA) rating or three times the amp hour (Ah) capacity of the battery.
3. Outside, start the vehicle engine and run at fast idle speed. 4. View the DC Volt Meter and read the Alternator & Regulator condition. Refer to the “Battery Condition Analysis” section below. 5. Turn the vehicle’s engine off, then remove the Load Tester Cable Clamps. Battery Condition Analysis LOAD TEST / 15 Sec. BATTERY CONDITION (Display Reading) OK Battery Capacity is good. May or may not be fully charged. Check (Green area) the charge state by testing the Specific Gravity SG) with a Hydrometer.
A display reading of 9 volts or less indicates excessive current draw. This may be caused by a bad connection of a failing starter motor, or, the battery is too small for the vehicle’s requirements. Consult a qualified mechanic. 6. When starter motor test is complete, remove Black Clamp (-) from battery first; then remove Red (+) clamp. INSPECTION, MAINTENANCE, AND CLEANING 1. Periodically check all nuts, bolts, and screws for tightness. 2. Store in a clean, dry location. 3.