
Product Manual


Page 6 of 14
Do not allow riders.
Use only on a hard level surface.
Inspect before each use. Do not use if parts are damaged.
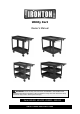
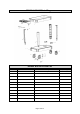
#53409 & #53412 Assembly Instructions
2-Shelf Utility Carts
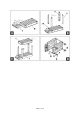
1. Place one Tray (1A) upside down on the work surface. Locate the Handle (3). Turn it upside down
with the cup holder toward the Tray (1A) and the hand holes on the outside. Using a rubber mallet,
tap the Handle (5) down into the grooves on the Tray (1A). See Figure A.
2. Locate the two Beams (4). Place one on the Tray (1A) corner nearest the Handle (3), and place
one on the diagonal corner located on the outside of the Tray (1A), as in the assembly diagram.
Make certain that the end with the screw holes is facing upward. Using a rubber mallet, tap the
Beams (4) down into the Tray (1A). Note: Position the Beams (4) so that the flange in each
matches the space in the Tray (1A). See Figure B.
3. Locate the two Beams (5). Place one on the Tray (1A) corner nearest the Handle (3), and place
one on the diagonal corner located on the outside of the Tray (1A), as in the assembly diagram.
Make certain that the end with the screw holes is facing upward. Using a rubber mallet, tap the
Beams (5) down into the Tray (1A). Note: Position the Beams (5) so that the flange in each
matches the space in the Tray (1A). See Figure B.
4. Inserts Screws (2) down through each Beam (4) and each Beam (5) into the Tray (1A). See
Figures B & C.
5. Locate the second Tray (1) and turn it upside down. Set the second Tray (1) onto the Beams (4 &
5) making certain that both Trays (1) are facing the same way. See Figure C.
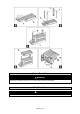
6. Turn the cart upside down. Attach two Casters (8) with the Swivel Caster Brackets (6) using a Nut
(7) and Screw (9), if necessary. Thread a Screw (13) through the Tray (1) and into the Casters (8).
7. Attach one Split Washer (11) and one Nut (12) for each hole. See Figure D.
8. Attach another two Casters (8) with the Fixed Caster Brackets (#10) using a Nut (7) and Screw
(9), if necessary. Thread a Screw (13) through the Tray (1) and into the Casters (8). Attach one
Split Washer (11) and one Nut (12) for each hole. See Figure D.
9. Place the two Swivel Caster Brackets on the same side of the Tray (1A) as the Handle (3).
10. Place the two Fixed Caster Brackets on the other side of the Tray (1A). See Figure D.
11. Turn the cart upright. Make certain that all hardware is tight. Make certain that the Fixed Casters
and Swivel Casters roll properly.