
Product Manual


Page 7 of 13
Assembly
Exposure to even low-pressure air or fluids is dangerous and can cause personal injury or death.
Note: Before beginning assembly/installation, purchase appropriate hardware for mounting the reel.
The mounting bracket has three 21/64” (8.3mm) holes for mounting on a suitable flat surface.
1. Prior to mounting the hose reel, ensure that the supply line pressure does not exceed the
maximum working pressure of the hose reel. Also check that the pressure source is turned off and
the supply line for the reel is unpressurized.
2. Unpack the reel then check that all parts are present and inspect for damage. Check reel function
for smooth operation.
3. For overhead ceiling mounting, install reel at most 10 feet / 3m above the floor.
4. Fasten the mounting bracket in the desired location. (If desired, remove the bracket from the reel
casing, mount the bracket, then reattach the casing to the bracket.) Tighten securely.
5. Apply Teflon tape or pipe sealant to the supply line threads then attach it to reel inlet and tighten.
If not already connected, the incoming line can now be connected to the supply source.
6. Apply Teflon tape or pipe sealant to the outlet fitting on the reel hose then attach it to a desired
tool, or nozzle. Check the connection for leakage and also check the hose reel for correct
operation (see the Operation section).
7. If an adjustment to the hose stopper is required, pull the hose from the reel and allow it to latch at
a desired length. Loosen the stopper bolts, and slide the stopper to a position close to the hose
guide. Retighten the stopper bolts and unlatch the reel.
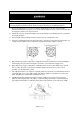
8. (49596 only) Double adjustment function. Inside the small left cover (item 7 in the parts list),
adjust the ratchet spring (25) to the right (see picture below) to prevent the reel from locking at
any length of unwound hose. Adjust the spring to the left to allow the reel to lock at any length.