
Tech Tip: Cantilever

TECHTIP
© 2018 IronRidge, Inc. All rights reserved. Visit www.ironridge.com or call 1-800-227-9523 for more information. Version 1.0
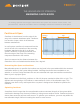
The best way to optimize the
cantilever is to start with your
rst rafter and mount. From
there, measure out the exact
distance of the max cantilever
and mark it as the edge of
your array, then continue with
your layout. If desired, after
marking all mount locations,
shift the array over to evenly
split the cantilever.
As a nal check, look
at your layout and ask,
“Without exceeding the
max cantilever, can I shift
this array and eliminate a
mount?” If the answer is
“yes,” do it. If the answer is
“no” congratulations, your
cantilever is optimized!
In some situations, you may
need to stagger mounts, but
you can still optimize your
cantilever on one rail in each
pair.
Case Study: IronRidge XR Offers Superior Spans and Cantilevers
The strength of XR100 Rail allows for a 61 inch max span. Cantilever is 40% of the span, or 24.4
inches. For the same array, competitor A’s max span is 60 inches but their cantilever is limited to 34%
of max span which is 20.4 inches. In this case, rafters are a typical 24 inches apart, so the spans
are limited to 48 inches on both systems, but because XR’s cantilever is 4 inches longer, you can
eliminate an entire column of mounts!
Reduce Costs with IronRidge XR
By maximizing the cantilever across 7 real world arrays and on average, IronRidge required 6 fewer
mounts per install. That is 6 fewer roof penetrations, mounts to purchase and attachments to install.
When comparing the total cost of racking, the Bill of Materials (BOM) for an XR system was 13% less!
It is clear that using a stronger product with longer spans and cantilevers like XR100 and designing
your array to optimize your cantilevers will deliver savings in time and materials!
Not Optimized, 8 Mounts
Optimized, 6 Mounts
Start Here
Shift Array