
Install Manual
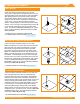

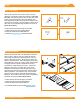

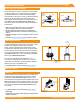
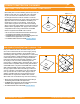
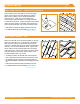
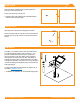
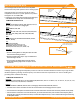
Table Of Contents

©
2021 IRONRIDGE, INC. VERSION 3.3 FLUSH MOUNT INSTALLATION MANUAL - 12
TILE
Remove tile and mark rafter. Use base as guide to drill
1/4” pilot hole and ll with roong manufacturer’s approved
sealant. Insert lag bolt with bonded washer through
base and drive until fully seated. Insert Tile Replacement
Flashing, lower onto base and apply pressure over the
threaded post until it dimples the ashing. Place L-Foot
over dimple and tap with hammer to punch threaded post
through the ashing. Ensure punched pieces of ashing
are cleared away. Form ashing as needed to sit ush with
surrounding tiles, position L-Foot in desired orientation
and torque hardware to 132 in-lbs (11 ft-lbs). Attach rail
to L-Foot with Bonding Hardware and torque to 250 in-lbs
(21 ft-lbs).
➢ Base can be installed in any orientation relative to rafter.
➢ Ensure L-Foot does not extend above rail.
➢ If deck level ashing is required, approved ashing methods
include user supplied adhesive backed exible ashing.
➢ Standalone Knockout Tile manual available on website.
Rafter
Orient Base to desired position
Tighten until fully seated
Dimple
Tap With
Hammer
Torque to
132 in-lbs
Torque to
250 in-lbs
KNOCKOUT TILE
QM TILE REPLACEMENT
Remove tile and mark rafter. Measure up 8 3/4" from the
adjacent tiles and mark horizontal across rafter. Align
baseplate over rafter so that the lag holes align with the
post groove. The orientation of the plate can be adjusted
cross roof, mark location of lag holes on the roof. Drill two
1/8" Pilot holes and back ll with roong manufacturers'
approved sealant. Waterproof at underlayment level
according to roong manufacturers' instructions and the
Tile Roong Industry Alliance guidelines. Use T-30 Torx
bit to lag base into position. Insert Grade 8 Serrated
Flange Bolt into bottom of the Post, slide Post into
Base channel. Line up post with the hole in the Tile
Replacement Flashing. Leave loose for adjustments.
Place Tile Replacement Flashing over the Post and Mount,
allowing the ashing to properly interlock with surrounding
tiles. Secure Post by tightening with channel lock pliers.
Replace all tiles. Apply a bead of sealant where the post
meets the ashing, slip EPDM collar over post and down to
ashing. Attach L-Foot on Stando with hardware. Torque
to 174 in-lbs (14.5 ft-lbs). Attach rail to L-Foot with
Bonding Hardware and torque to 250 in-lbs (21 ft-lbs).
➢ If deck level ashing is required, approved ashing methods
include user supplied adhesive backed exible ashing.
➢ For additional details refer to the full QM Installation Manual.