
UFO Tilt Mount Installation Manual
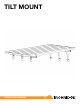

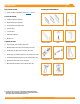
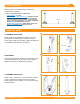

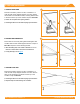
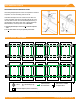
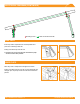

Table Of Contents

TILT MOUNT INSTALLATION MANUAL - 4©
2016 IRONRIDGE, INC. VERSION 1.10
1. ATTACH BASES
2. ADD TILT LEGS
Mark locations for roof attachments and attach per
manufacturer’s instructions.
í Tested or evaluated third-party roof attachments:
• Anchor Products - U-Anchor
• S-5! Standing Seam Metal Roof Clamps - Certication of metal
roof clamps includes bonding to both painted and galvalume
metal roofs. Tighten clamp set screws to 130-150 in-lbs (≥ 24
gauge) or 160-180 in-lbs (22 gauge) roofs. Tighten S-5! M10 bolt
to 240 in-lbs or S-5! Mini M8 bolt to 156 in-lbs.
• QuickMount PV Tilt Standos - QMNC, QMLSH; Tighten 5/16"
bolt on top of stando to a minimum of 140 in-lbs.
A. ASSEMBLE SOUTH LEGS
Mount South Tilt Leg Assembly to southern row of roof
attachments. The IronRidge logo should face east to
ensure proper South Leg orientation. Tighten assembly per
roof attachment manufacturer's instructions.
B. SET ANGLE
Set top pivot bracket of South Tilt Leg to the desired angle
using the angle indicator on the face of the leg. Finger
tighten bolts to allow for adjustment if necessary.
C. ASSEMBLE NORTH LEGS
Mount U-foot to northern row of roof attachments. Tighten
U-foot to attachment per manufacturer’s instructions.
Mount North Tilt Leg to northern row of U-feet and loosely
secure hardware.
A
B
C
Logo Faces East
Roof Deck