
Drawing

Aug-2019, Rev 12
BI7.2.3-6
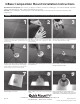
Fill pilot holes with sealant compatible with
roofing material. Seat grade 8 cap screw through
bottom of QBase. Place QBase over drilled holes
and secure lags in place, to a solid, snug fit.
Secure post to QBase turning post onto captive
base plate bolt.
Allow roofing to proceed to the point that the
flashing should be installed.
Install flashing over mount.
2
3
5
4
6
8
7
1
925-478-8269 | www.quickmountpv.com | info@quickmountpv.com
2700 Mitchell Dr. | Walnut Creek, CA 94598
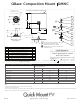
QBase Composition Mount Installation Instructions
Installation Tools Required: tape measure, roofing bar, chalk line, stud finder, caulking gun, roof material & EPDM compatible
sealants, drill with 7/32" bit, drill or impact gun with 1/2" deep socket.
Layout your array out over the roofing paper using
a chalk line to mark ra er centers and the rail
location center.
Align QBase vertical holes over center ra er mark
and horizontal holes over snapped line. Mark
holes for drilling.
Remove QBase and drill 2 each 7/32" pilot holes
into ra er. Hold drill square to ra er.
Allow roofing to proceed to the next mount
course.
Apply sealant where post and flashing meet.
Install EPDM counter flashing collar. Seal post
with hardware if not installing racking right away.
9
WARNING: Quick Mount PV products are NOT designed for and should NOT be used to anchor fall protection equipment.
©2019 by Quick Mount PV. All rights reserved.
CAUTION: Prior to installation, check that proper screw embedment will be achieved for the necessary site load and roofing
configurations.