
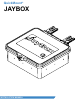
JayBox Installation Manual


©
2022 IRONRIDGE, INC. VERSION 1.2 JAYBOX INSTALLATION MANUAL - 8
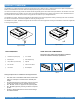
INSTALL JAYBOX ON FLASHING
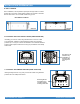
Align sealing oval of box to align with mating feature on
ashing. An EPDM foam gasket is pre-installed to the
underside of the junction box to seal the ashing to the box
without the need for additional sealant. Secure with supplied
#12 x 1-¾" deck screws (2x) until the junction box is pulled
tight to the ashing. Do not over-tighten screws to avoid
stripping screws in OSB.
➢ If installing pass through ttings, ensure that the JayBox
and roof deck are both properly prepared. Complete
installation process before attaching the Jaybox to the
deck.
INSTALL PASS THROUGH FITTINGS
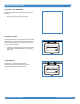
Using a pilot drill, begin drilling out the box at the desired conduit pass through location. It is acceptable to use any location inside the
watertight oval for a penetration. Drill through both the box and into the roong, marking the location on the roof of the clearance hole,
transferring the proper drill location to the roof surface.
Remove the box from the roof surface and nish creating conduit mating hole within the box with a step drill bit
Drill pass thru hole with clearance hole saw:
➢ 2 - 1/4" for 1 - 1/4" conduit tting
➢ 1 - 7/8” for 1” conduit tting
➢ 1 - 5/8” for ¾” conduit tting
➢ 1 - 3/8” for ½” conduit tting
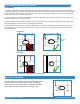
Install conduit tting to bottom of box provided per conduit ttings manufacturer instructions. Place Jaybox back over ashing and
secure to the roof using self drilling wood screws.
WIRING
Install wiring, conduit and ttings per NEC requirements and following local AHJ guidance.
Close lid and fasten with Philips Head Screw Driver, tighten screw 50 in-lbs. Do not overtighten lid screw.
Attach with self
drilling wood
screws