
JayBox Installation Manual


©
2022 IRONRIDGE, INC. VERSION 1.2 JAYBOX INSTALLATION MANUAL - 7
DECK MOUNTED INSTALLATION
INSTALL FLASHING
A. LOCATION
1. Locate the Junction Box during the system design process to ensure optimal placement and compliance to permit requirements. It is
acceptable to install the Junction Box under a PV module. To service the PV system, it is important to have access to the Junction Box
after the installation. When installing the Junction Box under a module, consider placing it under the last module in a string or under a
module that is easy to lift out of position for access.
2. Place the junction box in a location that will limit contact of the module back sheet under high snow loads, such as near a module
frame edge rather than the center of the module.
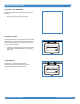
3. Place the Junction Box in a location that avoids keyways, shingle joints or tabs in the shingle course above the Junction Box. The
ashing is designed for use with typical 5”- 5-7/8” asphalt shingle coursing.
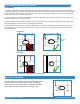
4. If utilizing the attic pass-through, do not install the Box directly over a rafter such that the rafter interferes with the conduit coming
down from the Box. If you run your wires through the attic, place the Junction Box in an optimal location for access when working
inside the attic space.
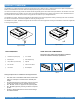
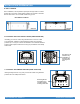
Carefully loosen the shingle glue line at the second shingle course
and insert the ashing to the V alignment marks. The ashing
should not overhang the shingle, and the marking for UPSLOPE
on the ashing should be under the second shingle course
Do not install over a rafter when using the pass-through.
Avoid Keyways
Avoid Rafters
Drill starter
locations