
Flat Roof Attachment Install Manual


Installation
© 201
9 IronRidge, Inc. All rights reserved. Visit www.ironridge.com or call 1-800-227-9523 for more information.
FRA-01-MAN REV 1.1
For freeze/thaw locations, a roof manufacturer's
approved sealant should be applied around the 3/8”
bolt and in the bracket’s slot prior to tightening the
bolt.
3
4
Tools Required: tape measure, chalk, approved sealing materials, roof screws, driver with 9/16” hex socket
Mark locations for Flat Roof Attachment. Roof
screws can be installed before or after racking is
installed. Type, size, and quantity of roof screws
to be specified by Structural Engineer. Fastener
size not to exceed #15. Screws should be
installed symmetrically to each other.
Attach rail mounting bracket with washers and 3/8”
hardware torqued to 250 in-lbs (21 ft-lbs). Seal
attachment and/or membrane per roofing
manufacturer’s requirements.
2
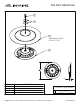
If using a membrane flashing, remove the silicone
washer's protective liner prior to attaching the
membrane. Thread a bolt into the base to help center
the membrane during the welding or adhering
process. Ensure membrane flashing is compatible with
existing roofing material.
1
Structural Certification
Designed and Certified for Compliance with the International Building Code & ASCE/SEI-7.
UL 2703
Conforms to UL 2703 (2015) Mechanical and Bonding requirements. See Ironridge Tilt or
Flush Mount Manuals for full ratings.
LA Research Reports (LARR)
Approved for use in City of Los Angeles per LARR #26185
Backfill rail mounting
bracket's slot with
approved sealant.