
Contour Install instructions
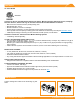
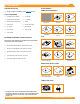
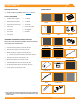
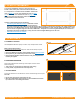
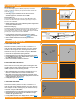
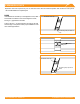
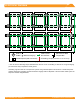
Table Of Contents

©
2022 IRONRIDGE, INC. VERSION 3.5 FLUSH MOUNT INSTALLATION MANUAL - 7
B. PLACE MODULE
Place module on rails (module cells not shown for
clarity). When installing CAMO the module can
overhang the rail no more than 1/4".
D. SECURE TO FRAME
Rotate handle with an upwards motion until CAMO
snaps into rail channel. Ensure CAMO bonding
pins are fully seated on top of module frame.
CAMO
A. SLIDE INTO RAIL
Slide CAMO into rail channel far enough to clear the
module frame. CAMO requires 6" of clearance from end of
rail.
C. PULL TOWARDS END
Pull CAMO towards rail ends, at 45 degree angle, so the
bonding bolt contacts the module ange edge.
B
C
D
A
6" Clearance
8" BONDING JUMPER
8" Bonding Jumper is an electrical bonding jumper that can
be used on the Flush Mount System for row to row bonding;
making the module frames the medium for the equipment
ground path.
➢ Bonding jumper is pushed onto the bottom ange of the module.
➢ New jumpers should be used if re-installation of jumper is required.
➢ Supports bottom ange thicknesses from 1.2mm to 3.1mm.
FRAME COMPATIBILITY
CAMO has been tested or evaluated with all modules listed in the
Module Compatibility section having frames within the referenced
dimensions. Be sure the specic module being used meets the
dimension requirements.
➢ For installations with Hanwha Q CELLS modules with 32 mm frame heights,
the maximum ground snow is 45 PSF (33 PSF module pressure).
➢ CAMO is only compatible with Canadian Solar modules CS1YxxxMS and
CS3N-xxxMS. “xxx” refers to the module power rating