
Contour Install instructions
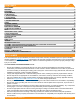
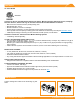
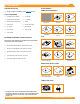
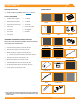
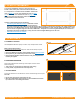
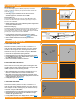
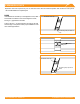
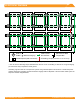
Table Of Contents

©
2022 IRONRIDGE, INC. VERSION 3.5 FLUSH MOUNT INSTALLATION MANUAL - 3
ATTACHMENTS
BONDING HARDWARE TORQUE VALUES
Please refer to each attachment's individual section for full details
on all torque values and instructions.
☐ 3/8" Bonding Hardware Nuts (7/16" Socket): 250 in-lbs
☐ All Tile Hook Carriage Bolts (7/16" Socket): 132 in-lbs
☐ Flat Roof Attachment Nuts (9/16” Socket): 250 in-lbs
☐ Lynx Set Screw (3/16" Hex Drive): 150 in-lbs
☐ Lynx Flange Nut (1/2" Socket): 150 in-lbs
➢ If using previous version of Integrated Grounding Mid Clamps,
End Clamps, Expansion Joints and for a list of approved 3rd party
components please refer to Alternate Components Addendum
(Version 1.9)
ATTACHMENTS
QM L-MountFlashVue
QM Quick Hook and
Flashing (optional)
QM QBase Tile
A A
B B
C C
D D
E E
F F
8
8
7
7
6
6
5
5
4
4
3
3
2
2
1
1
All Tile Hook and
Flashing (optional)
FlashFoot2
COMPOSITION SHINGLE
TILE
QM Tile Replacement
QM Classic Comp
Mount
QM QBase
QM QBase MountFlat Roof Attachment
LOW SLOPE ROOF
QM Classic Mount
Shake
QM Qbase Shake -
Slate - Metal Shingle
ADDITIONAL ROOF TYPES
PRE-INSTALLATION
☐ Verify module compatibility. See Page 21 for info.
TOOLS REQUIRED
☐ Cordless Drill (non-impact)
☐ Impact Driver (for lag bolts)
☐ Torque Wrench (0-250 in-lbs)
☐ 7/16” Socket
☐ 1/2" Socket
☐ 9/16" Socket
☐ 7/32" Drill Bit
☐ 1/8" Drill Bit
☐ 1/4" Drill Bit
☐ T30 Bit
☐ Channel Lock Pliers
☐ #3 Phillips Bit
☐ 3/16" Hex Bit
QM Lynx Metal Roof
Attachment
QM Tile Conduit
Penetration
QM Composition
Conduit Penetration
Knockout Tile