
Contour Install instructions
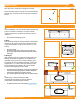
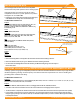
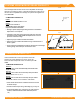
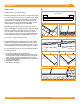
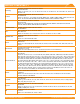
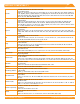
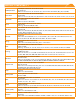
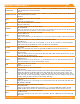
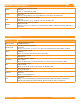
Table Of Contents

©
2022 IRONRIDGE, INC. VERSION 3.5 FLUSH MOUNT INSTALLATION MANUAL - 21
CONTOUR
Install Contour
Install Contour on a completed array.
A. Start by placing Contour Clamp on module frame within
12 inches of the down roof corner of the array. Each piece
of 84" Contour Trim must be suppported by two Clamps.
Clamps must be installed in the 12" clamping zones at
edge of trim. Once trim is placed and in position, secure
trim by tightening Clamp set screw to 80 in-lbs.
B. Multiple Contour pieces can be joined using Contour
Splice. Install Splice on exsisting Contour edge and install
Clamps in appropriate clamping zones for next piece of
trim. Place trim on Clamps, slide into splice to join two
pieces together. Secure Contour by tightening Clamp set
screw to 80 in-lbs. Repeat as needed across the array.
C. Cut trim to line up with edge of array.
D. Install Clamps within clamping zones on side of array.
Install second Clamp as needed up array. Place Corner
Cap on trim and slide side trim to align with Cap. Repeat
as needed along roof for both inside and outside corners.
E. Use optional End Caps to cover any exposed edges of
Contour as desired.
➢ Do not install on side of array facing roof peak.
➢ Contour can be installed with 1 clamp if trim section is 12" long
(or shorter) and has a splice attached on one end, on which the
section of trim the 12" section is spliced to also has 2 clamps.
➢ Contour Trim when installed when installed up roof requires the
use of Aire Stealth Clamps.
➢ Wind Speed: no restrictions
➢ Ground Snow: up to 90 PSF
12.00 12.00
A.
Clamping Zones
E.
D.C.
B.
Push Trim and
install ush