
Contour Install instructions
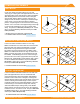

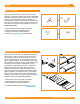
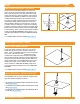
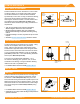
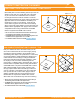
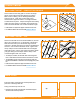
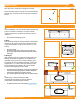
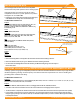
Table Of Contents

©
2022 IRONRIDGE, INC. VERSION 3.5 FLUSH MOUNT INSTALLATION MANUAL - 18
END CAPSWIRE CLIPS
Wire Clips oer a simple wire management solution.
Firmly press Wire Clip into top rail slot. Run electrical wire
through open clip. Snap closed once all wires have been
placed.
Press Clip
into Slot
Run Wire
Snap Clip
Closed
JAYBOX
A.
Prior to installation, use step drill bit to place pass through
holes for conduits or water-tight connectors. Drill bit
starter locations are provided on the sides and front of
enclosure.
➢ Do not install conduit facing up roof.
B (Rail).
Use rail-specic MLPE mounting hardware to attach Rail
Hangers to rail. Ensure junction box is pushed as close
to the rail as possible. Torque to 80-in lbs (1/2" or 7/16"
socket).
➢ Do not overtighten
➢ If installing in areas with ground snow loads greater than
40 psf, install JayBox under module directly next to module
frame edge.
B (Shingle).
Align sealing oval of box to align with mating feature on
ashing. An EPDM foam gasket is pre-installed to the
underside of the junction box to seal the ashing to the
box without the need for additional sealant. Secure with
supplied #12 x 1-¾" deck screws (2x) until the junction
box is pulled tight to the ashing. Do not over-tighten
screws to avoid stripping screws in OSB.
➢ If installing pass through ttings, ensure that the JayBox and
roof deck are both properly prepared. Complete installation
process before attaching the Jaybox to the deck.
➢ Do not install JayBox under shingle seam as illustrated below.
C.
Install wiring, conduit and ttings per NEC
requirements and following local AHJ guidance.
Using Philips Head Driver tighten the bolt.
➢ For additional details refer to the full QM Installation Manual.
Keyways and
shingle joints
Drill starter
locations